

Role-based access control (RBAC) helps us to restrict system access only to authorized users. NSX-T Data Center appliances have two built-in users admin and audit. We need to integrate the NSX-T Data Center with VMware Identity Manager (vIDM) to configure role-based access control (RBAC) for the NSX-T access control. With VMware Identity Manager, you can set up and manage authentication methods and access policies, customize a catalog of resources for your organization’s applications and provide a secure multi-device managed user access to those resources. In this article, I will explain the detailed step by step procedure to Integrate NSX-T Manager with vIDM.
Pre-requisites for Integrating NSX-T Manager with vIDM:
NSX-T Deployed and configured
VMware Identity Manager is deployed and configured
VMWare Identity Manager is integrated with Active Directory
NSX-T & vIDM must be Time Synchronized with Valid NTP servers
How to Integrate NSX-T Manager with vIDM
Step 1. Get the Certificate Thumbprint from vIDM Server:
Login to vIDM Manager using “sshuser” and su into root. Navigate to the directory “cd /usr/local/horizon/conf/”
openssl x509 -in vidmservername.domain.com_cert.pem -noout -sha256 -fingerprint
Make a note of the thumbprint. We need this thumbprint in the upcoming steps in integrating NSX-T with vIDM.

Step 2. Creating a OAuth client ID for the NSX-T Manager in vIDM
Create an OAuth client ID entry for NSX-T in vIDM. This will allow us to later register NSX-T and to establish the communication channel between NSX-T and vIDM.
To create OAuth Client ID, Login to vIDM Manager with admin credentials. Navigate to Catalog -> Settings
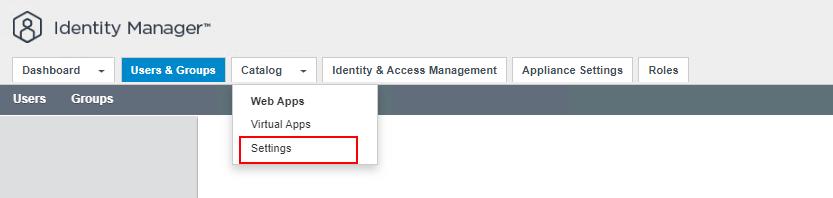
Click “Remote App Access” -> Clients -> Create Client.

In the Access Type option, Select Service Client Token. Specify the Client ID (I have specified “nsxt-mgr”). Make a note of Shared Secret then Click Add.
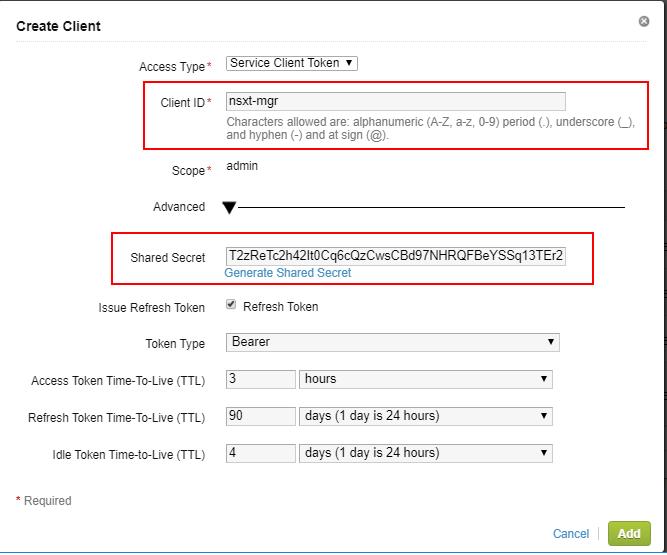
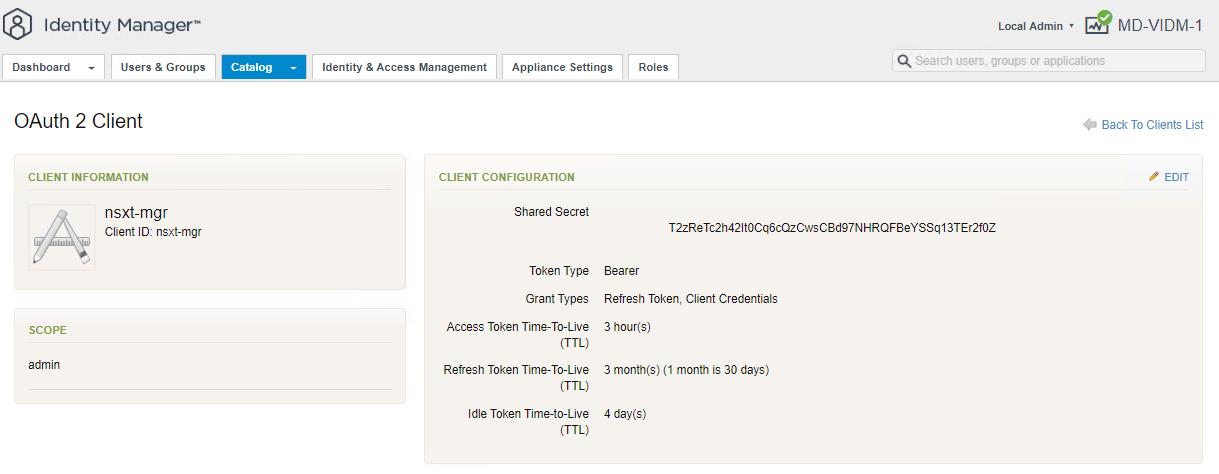
OAuth Client is created Successfully. It will be visible under Remote App Access.
Step 3. Register NSX-T Manager with vIDM
The third step is to register the NSX-T Manager with the vIDM. Login to NSX-T Manager with admin credentials.
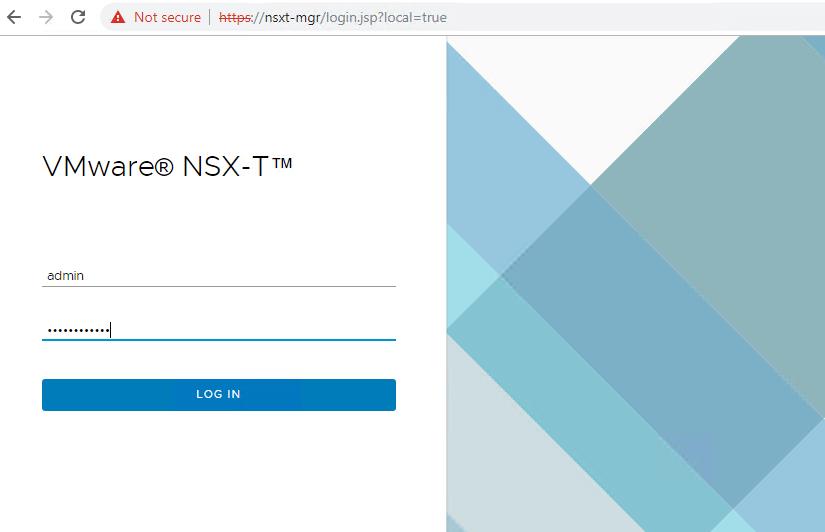
Navigate to System -> Users -> Configuration -> Edit. VMware Indentity Manager Integration will be in “Disabled” state before the integration.
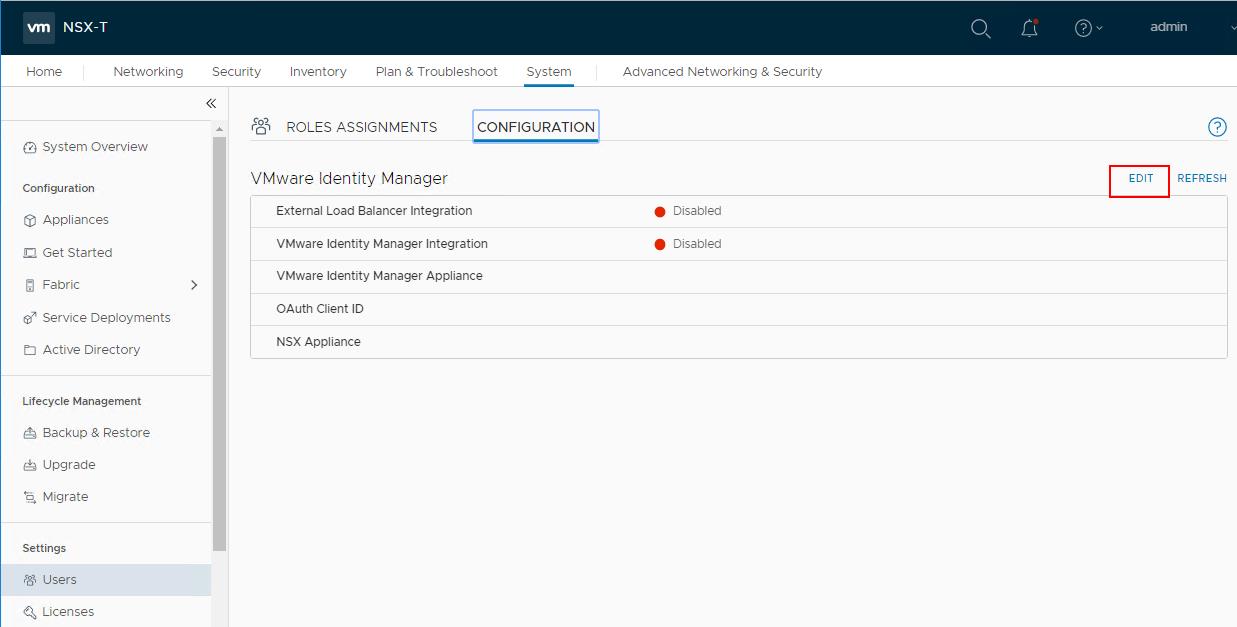
Toggle the button to Enable VMware Identity Manager Integration. Update the Values that were captured while creating OAuth client in vIDM and SSL Thumbprint that was captured earlier then click on Save
- vIDM appliance Manager in FQDN format.
- Enter the OAuth Client ID. Specify the same name as we specified as Client ID in step 2
- Paste the OAuth Client Secret which we have copied in step 2.
- Paste the SSL Thumbprint which we have obtained in step 1.
- Specify the NSX Appliance Name. I am specifying my NSX-T Manager VIP FQDN.
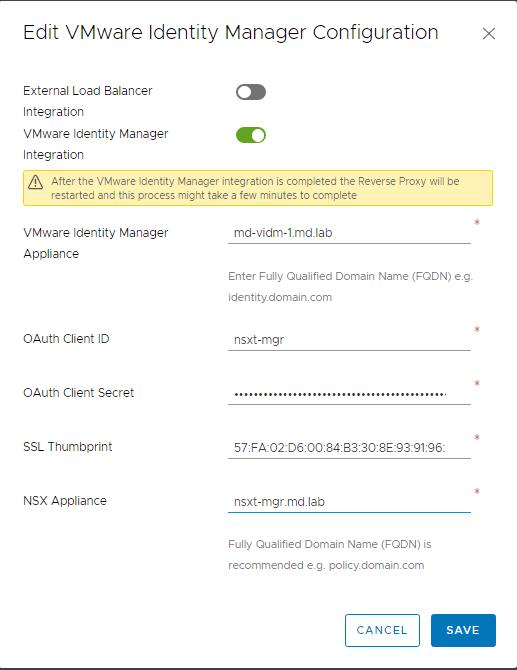
Verify that the vIDM configuration settings are saved successfully. Under the VMware Identity Manager Configuration, you should see the status as below:
VMware Identity Manager Connection -> Up
VMware Identity Manager Integration -> Enabled
Step 4. Role Assignments in NSX-T Manager
To assign access to the NSX-T manager for active directory users. Groups or Users should be specified and synced in the vIDM Manager. Once we specified the groups and Users in the vIDM manager as discussed in our previous article. we can then assign the roles to the AD groups or users to access NSX-T.
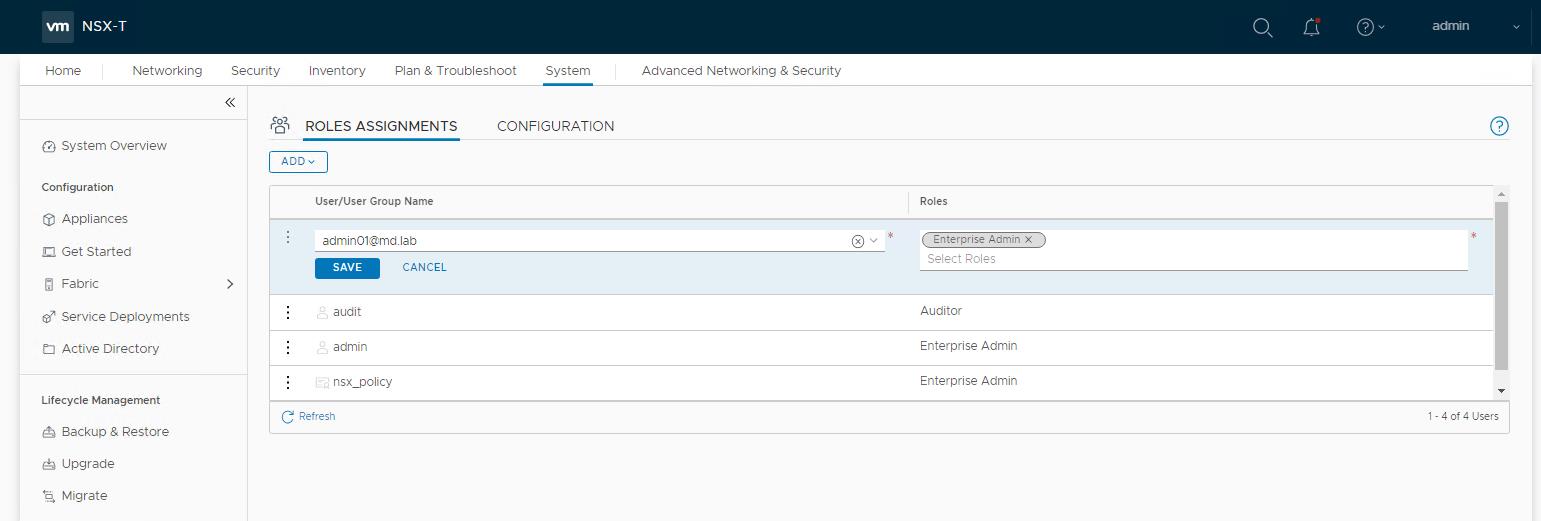
To Assign the Role -> Login to NSX-T Manager with admin credentials -> System ->Users -> ROLES ASSIGNMENTS -> ADD -> Role Assignment
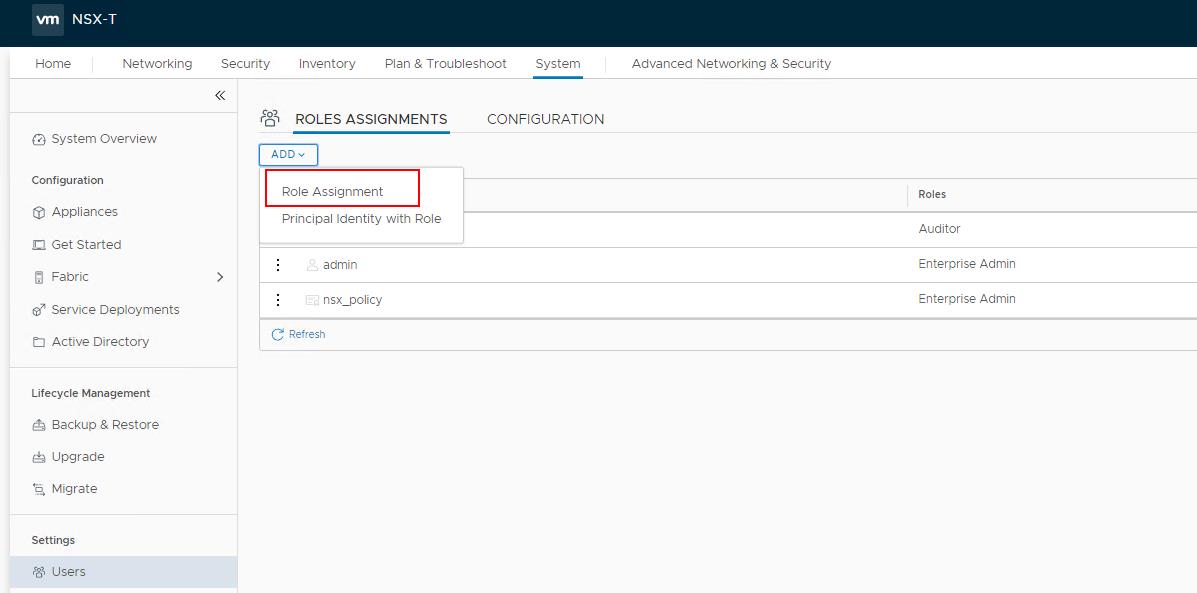
NSX-T Data Center has the following built-in roles. You can assign any roles to the AD users. We cannot create any new roles in NSX-T Manager.
- Enterprise Administrator
- Auditor
- Network Engineer
- Network Operations
- Security Engineer
- Security Operations
- Cloud Service Administrator
- Cloud Service Auditor
- Load Balancer Administrator
- Load Balancer Auditor
Search for the Active directory users in the User/Usergroup Name. It will only list the users or groups which were added and Synced in the vIDM Manager. Select the Role in the Roles option. Click Save.
In my example, I have an AD user account called “admin01”. admin01 is part of the AD security group called “orgadmins” which I have synced the group in the vIDM Manager. You can take a look at my article to see how to integrated AD with VIDM and Sync the groups and Users.
Step 5. Validate the NSX-T Acess for vIDM Users
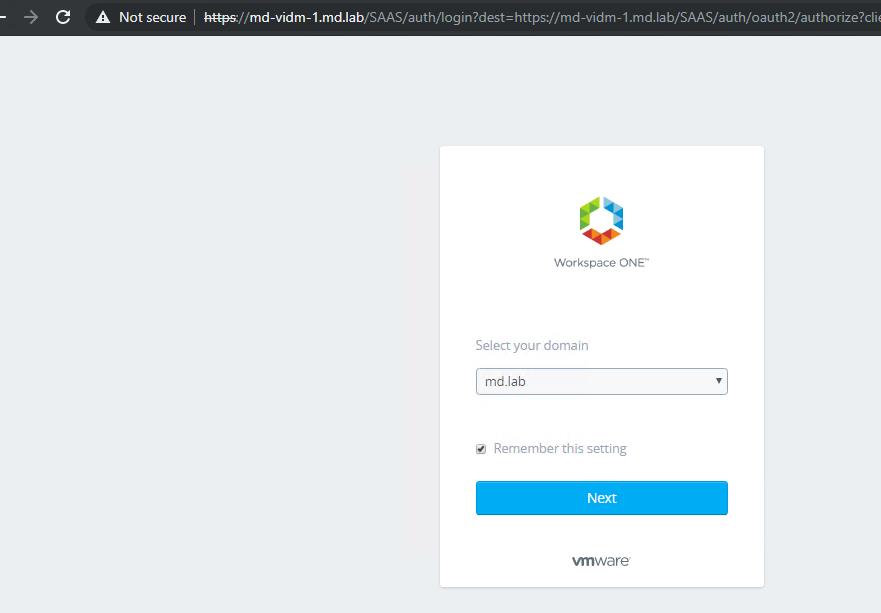
To validate the NSX-T access for vIDM users, Logout from the NSX-T Manager. Access the NSX-T Manager using the VIP URL (Which is mentioned in NSX-T settings in identity Manager integration.

For authentication, it will redirect the login page to the vIDM instance. Select the Active Directory domain. Click Next.
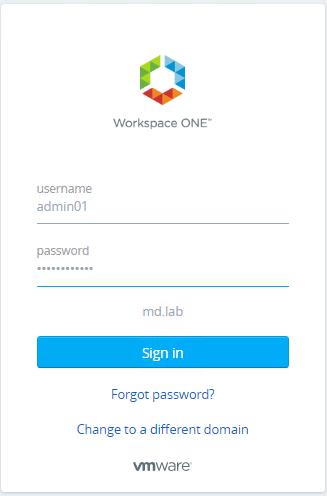
Specify the username and credentials of the AD username synced in the vIDM to login to NSX-T Manager. Click Sign in.
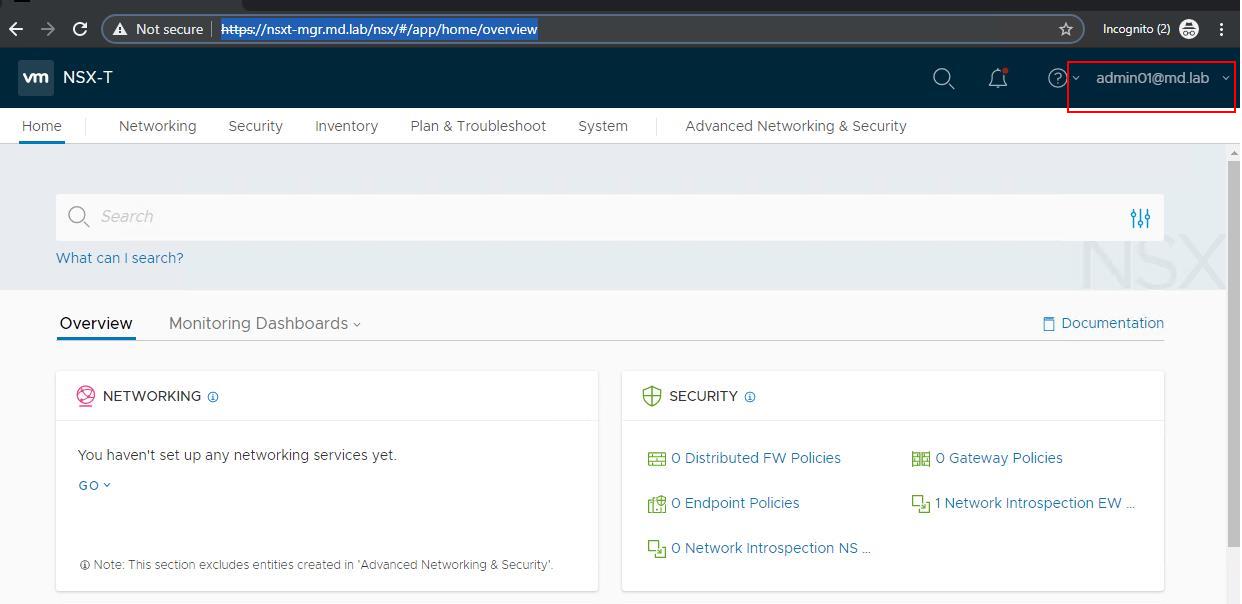
We have successfully logged into NSX-T Manager UI using the active directory user account called “admin01@md.lab”.
That’s it. We have successfully done with integrate NSX-T Manager with vIDM and also validated the access to NSX-T Manager as well. I hope this article is informative for you. Thanks for Reading!!!. Be social and share it with social media, if you feel worth sharing it.