The CIMCOR CimTrak Integrity & Compliance Suite application provides a flexible file-based security solution that allows Administrators the capability to protect selected files, operating system components, and network device configurations against unauthorized changes from a centralized location within the network. Cimtrak is the perfect file integrity monitoring for VMware ESXi configuration. CimTrak immediately identifies the change, determines if it is authorized and then institutes corrective action based on the application configuration. Since CimTrak maintains a master set of protected files, unauthorized changes can immediately be reversed to mitigate malicious activity or human error.
Cimtrak File Integrity Monitoring for ESXi
Most of the administrators might be worried about the misconfiguration or modifications to the configuration files of your servers. Which really affect the operational efficiency. We may need to monitor the configuration changes performed on our Servers or hypervisors. Any Organization or enterprise looking to implement file integrity monitoring compliance of your IT infrastructure to keep track of each configuration changes performed on your ESXi. Right choice will be Cimtrak. Awareness of VMware ESX server configuration changes is vital in maintaining a stable, secure virtual machine host. Monitoring the integrity of these configurations ensures that the hosted systems remain available for supporting day-to-day business operations. Because VMware ESX hypervisors generally run many virtual machines, unexpected or malicious changes can quickly cripple an organization’s IT infrastructure. In this series of posts, we are going to discuss in detail about the detailed installation procedure of various components of Cimtrak integrity suite. We have already discussed in my previous post about the overview of Cimtrak ESXi configuration monitor.
Important components of CimTrak:
- CimTrak Master Repository: Securely stores files and configurations and performs comparisons to detect changes.
- CimTrak Agents/Modules: Available for a variety of components and applications within the IT environment and sends files or configurations back to the CimTrak master repository for comparison.
- CimTrak Management Console: Centralized platform to manage and configure the CimTrak solution
Installing Cimtrak Master Repository
The CimTrak Master Repository maintains a centralized store of protected files and change history within a centralized server. This store provides an isolated, compressed, and encrypted copy of critical files that allows for restoration in the event of unauthorized change and provides a basis for identifying changes made to protected files and configurations within the network. Additionally, the application supports a rollback capability which allows previous versions of a protected file or configuration to be restored at a later date. Cimtrak is the core component of file integrity monitoring suite.
OS and System Requirements for Cimtrak Master Repository
Operating System Requirements:
Microsoft™ Windows XP SP2 or SP3
Microsoft™ Windows Server 2003 R1 Release, SP1, or SP2
Microsoft™ Windows Server 2003 R2 Release, SP1, or SP2
Microsoft™ Windows Vista Release, SP1, or SP2
Microsoft™ Windows Server 2008 R1 Release, SP1, or SP2
Microsoft™ Windows Server 2008 R2 Release, SP1, or SP2
Microsoft™ Windows 7 Release, SP1
Microsoft™ Windows 8.x
Microsoft™ Windows Server 2012
Linux Kernel 2.6.32 and Above (Red Hat & CentOS Distributions)
System Requirements:
Personal computer or server with Pentium-compatible processor
Pentium 3 1.2 GHz or greater
512 MB RAM and 220 MB hard disk space available
10/100/1000 Mbps Network Interface
Installation Procedure – Cimtrak Master Repository
Download the cimtrak 30 days trail and navigate to the downloaded location. Run the installer file “setupWin32.exe” to begin the installation of cimtrak master repository.

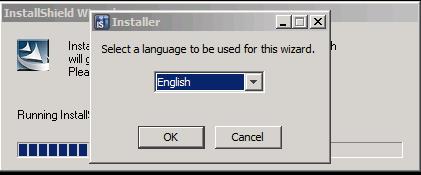
Please select the preferred language for the installation process from the drop down and then click “OK” to continue the CimTrak Installation Wizard.


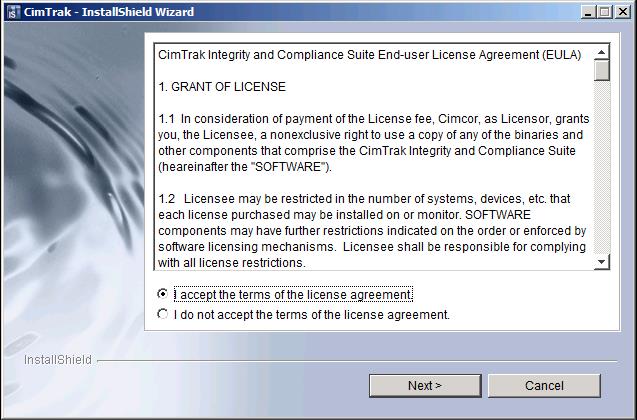
click on “I accept the terms of the license agreement” radio button to accept the license agreement and click on “Next”.

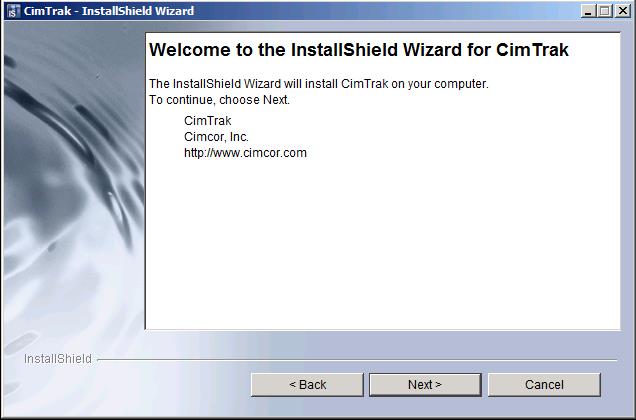
In the welcome screen of Installshield wizard for cimTrak, click on next to continue.

CIMCOR recommends leaving the installation path as its default to facilitate with any future support needs or product update requirements. Changing the installation directory is possible by either manually typing the installation directory path in the “Directory Name” text box or graphically selecting the installation location by clicking the “Browse” button


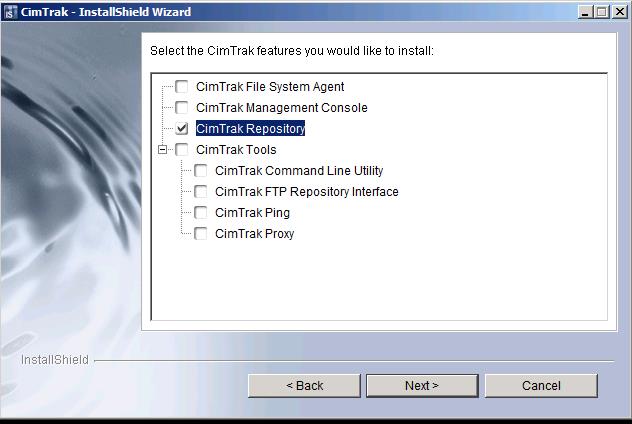
In the cimtrak features like, select “cimtrak repository” to begin the installation of cimtrak master repository and click on “Next”. CIMCOR recommends installing the File System Agent, Master Repository, and Management Console on separate systems. However, it is also possible to install all the components on a single system.

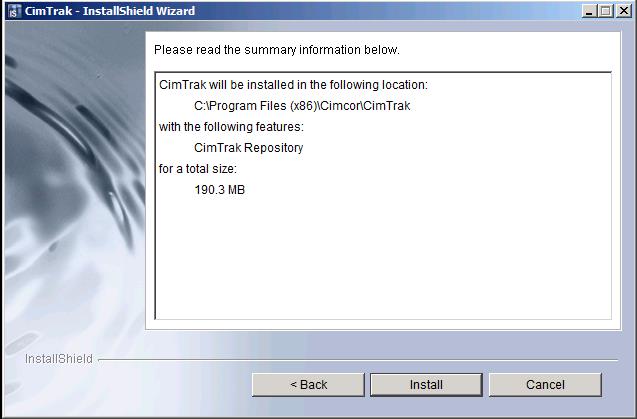
Read the installation summary and click on “Install” to proceed with the installation.

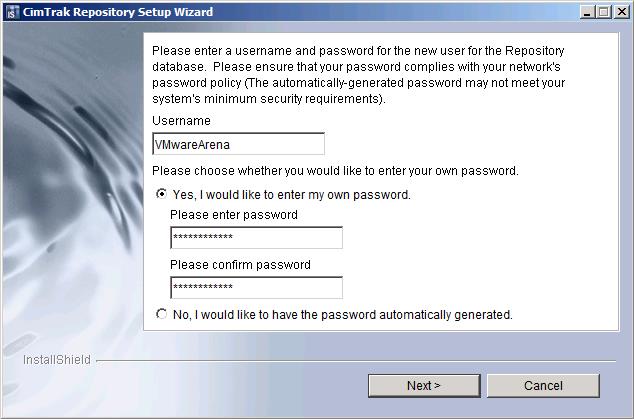
Once the supporting components have installed the Master Repository Database User dialog will display. This dialog provides the installing user the opportunity to customize the user-level service account required to run the integrated PostgreSQL database. This account is intended to add additional security to the Master Repository operating system by limiting the privileges available to the account in the event the account has been compromised. This account does not have Administrator, Auditor, or Standard User privileges granted for access to the CimTrak Management Console. Enter the username and Click on Radio button “Yes, I would like to enter my own password” to input your password for the user or Select “NO, I would like to have the password automatically generated” to generate automatic password. Click on Next.

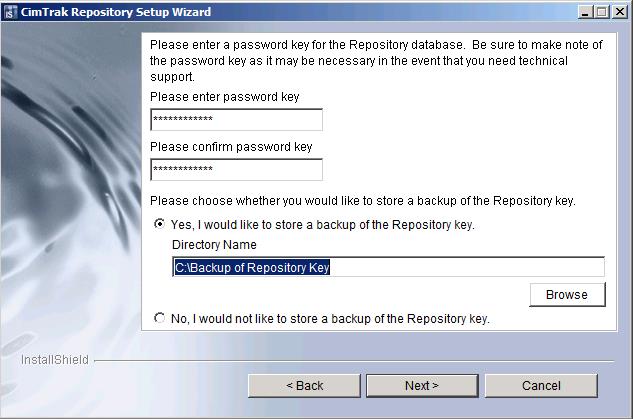
Please enter a password key for repository database. This repository database maintains a centralized store of protected files and change history within a centralized server. This core component of file integrity monitoring. Kindly make a note of the password key as it may be necessary in the event of technical support. Select the respective options to store a backup of repository key or no backup for repository key. Click on Next.

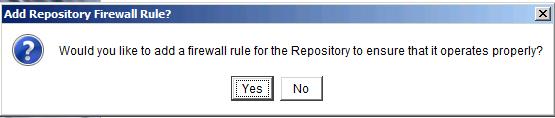
Repository installation requires to add firewall rule for the repository to operate properly. To approve the creation of the firewall rule click “Yes”. Click “No” to deny the creation of the firewall rule.

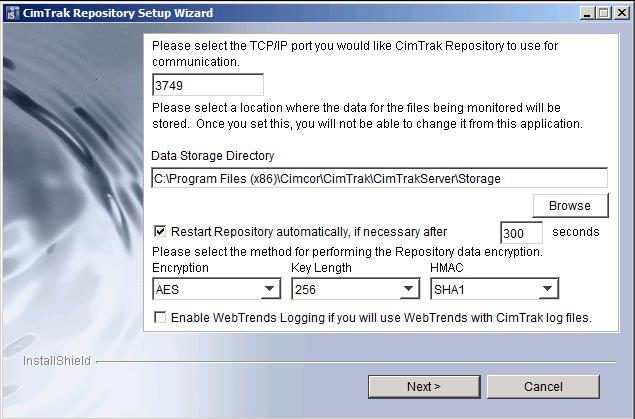
Specify the TCP/IP port number (default is 3749) on which the Master Repository will communicate, the directory where the Master Repository authoritative copy and intrusion files will reside, the type of encryption used for encryption and decryption of data stored in the Master Repository. Also select whether or not to automatically restart the Master Repository in the event of unexpected service termination, and whether or not to enable WebTrends Logging to use WebTrends with CimTrak log files. When finished, click “Next” continue the
installation process.

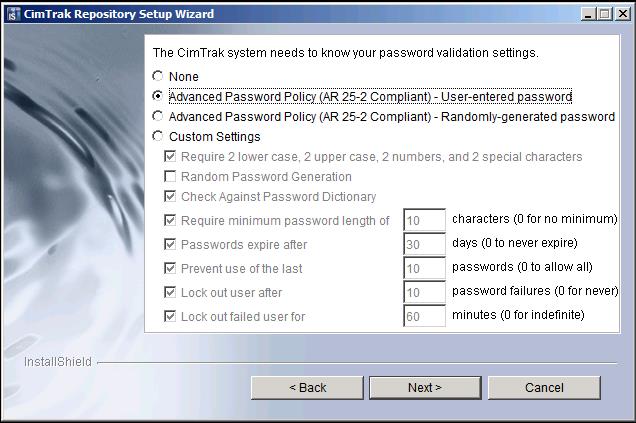
The Password Validation dialog allows the installing user to customize CimTrak password requirements to meet the needs of their organization. Available options for password validation requirements include:
- None
- Advanced Password Policy (AR 25-2 Compliant) -User-Entered password
- Advanced Password Policy (AR 25-2 Compliant) -Randomly-generated password
- Custom settings
Select the appropriate password validation settings and click on Next.

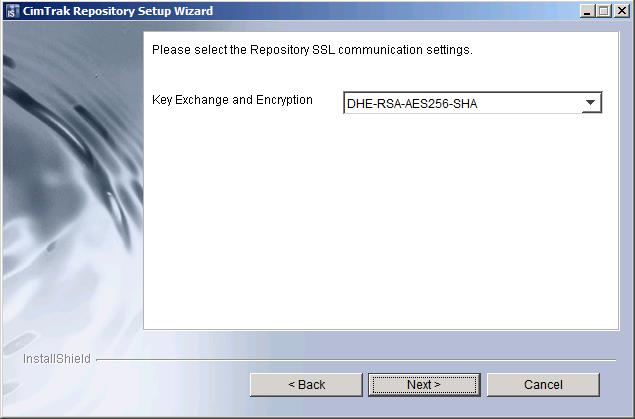
All communications between CimTrak components are encrypted using user specified
key exchange and encryption ciphers. Select the Key Exchange and encryption type from the drop-down and click on Next.
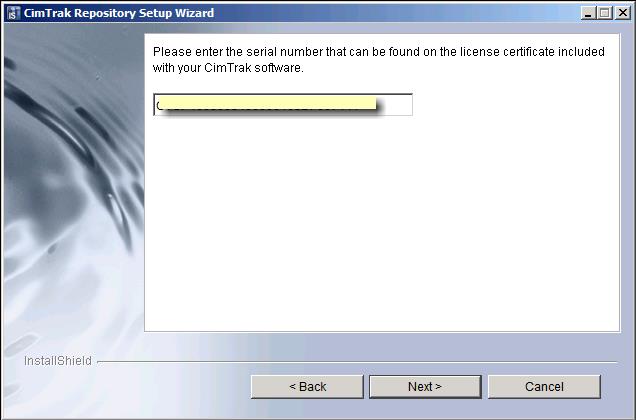
Enter the serial number for installing the cimtrak software. Serial numbers may be obtained from your purchased License Certificate or an authorized CimTrak sales representative. If you are evaluating cimtrak, you can continue with the installation with without entering the license key. Later you can add it from management console. Limited trial mode allows CimTrak to function for 30 days with a single File System Agent attached. After the 30 days you will no longer be able to use CimTrak . Click on Next.
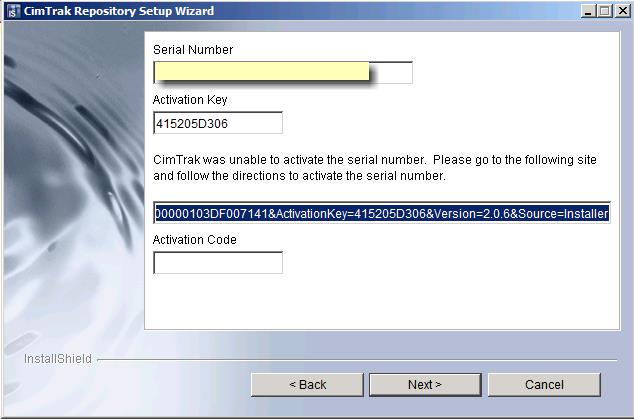
My lab environment is not connected to internet to activate the serial number. In case, the installer cannot communicate with the Activation Server additional, activation steps may be necessary to activate CimTrak. The CimTrak Installation Wizard will display a dialog providing your entered Serial Number, Activation Key, and activation URL. It will be necessary to use a Web Browser to navigate to the URL listed in the dialog.

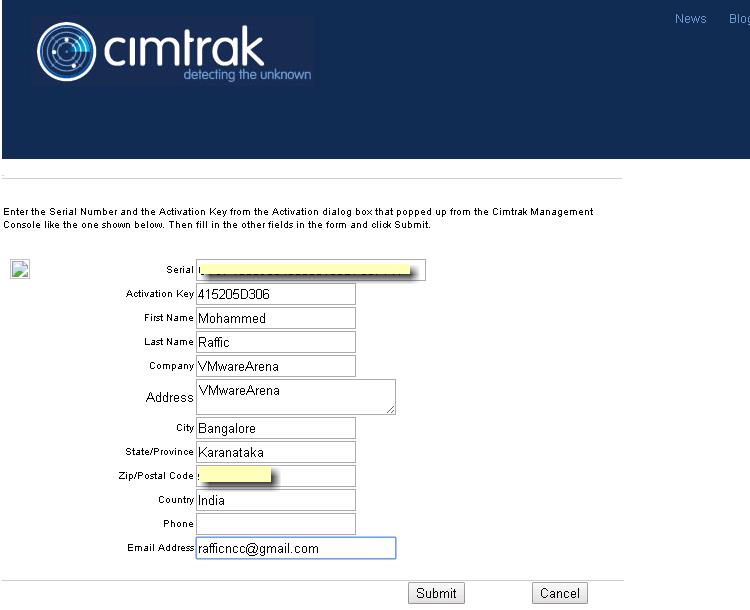
Open the URL specified in the above step and enter the required information like Serial number and Activation key and Click on Submit.

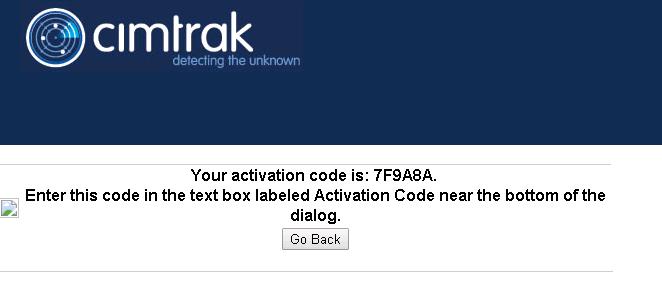
Once you have submitted the required information, you will receive the activation code.

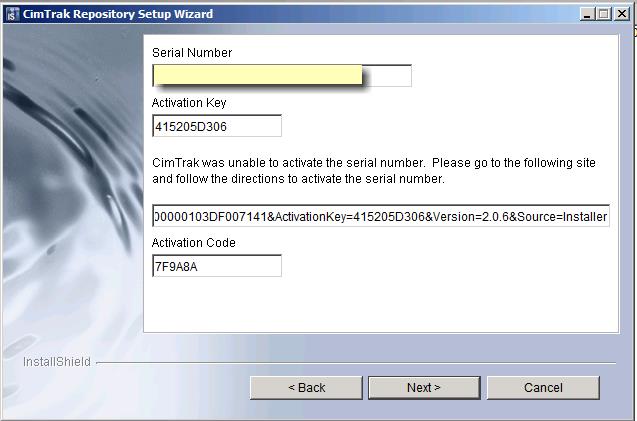
Enter the activation code received in the above step in text box labeled Activation code and click on Next.

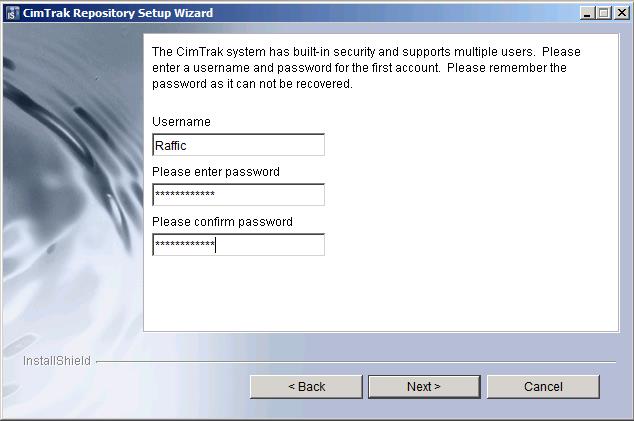
The cimtrak system has built-in security and supports multiple users. Enter the username and password for the first user account and click on Next.

Once installation is completed, Click on Finish to close the installation wizard of cimtrak master repository.
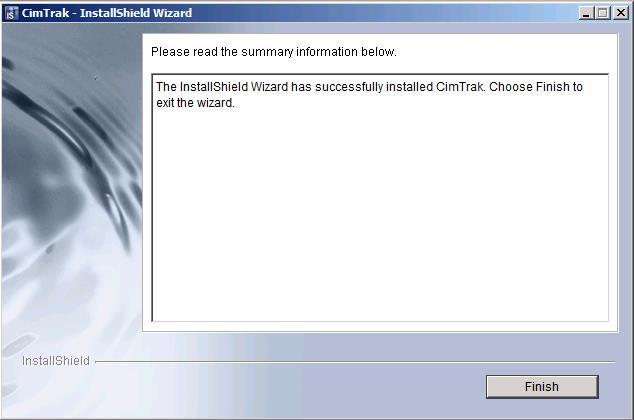
That’s it. We are done with the installation of installation of cimtrak master repository. one of the core component for file integrity monitoring for ESXi. We will take a look at the detailed procedure of other cimtrak components installation and configuration to setup the file integrity monitoring suite for ESXi in upcoming posts. I hope this is informative for you. Thanks for Reading!!!. Be social and share it in social media like Google+, facebook and twitter.