

VMware vSphere uses Certificates to ensure secure communication between all the VMware components such as vCenter and the ESXi nodes, etc. VMWare vSphere’s internal certificate authority, VMware Certificate Authority (VMCA), provides all the certificates necessary for ESXi and vCenter Server. VMCA is installed on every vCenter Server host, immediately securing the solution without any other modification. By default, the vCenter Server Certificate is a Self-signed certificate.
VMware vSphere also provides a mechanism to replace Self-signed certificates with custom CA-signed certificates as well for securing communications using signed certificates. In this article, I will explain detailed information about vCenter server certificates, how to check the certificate validity, replace with vCenter server self-signed certificate with custom CA-signed certificates.
How to find the expiration date of vCenter Server certificates?
You can check the vCenter server certificate expiry from various methods. Let’s check each method.
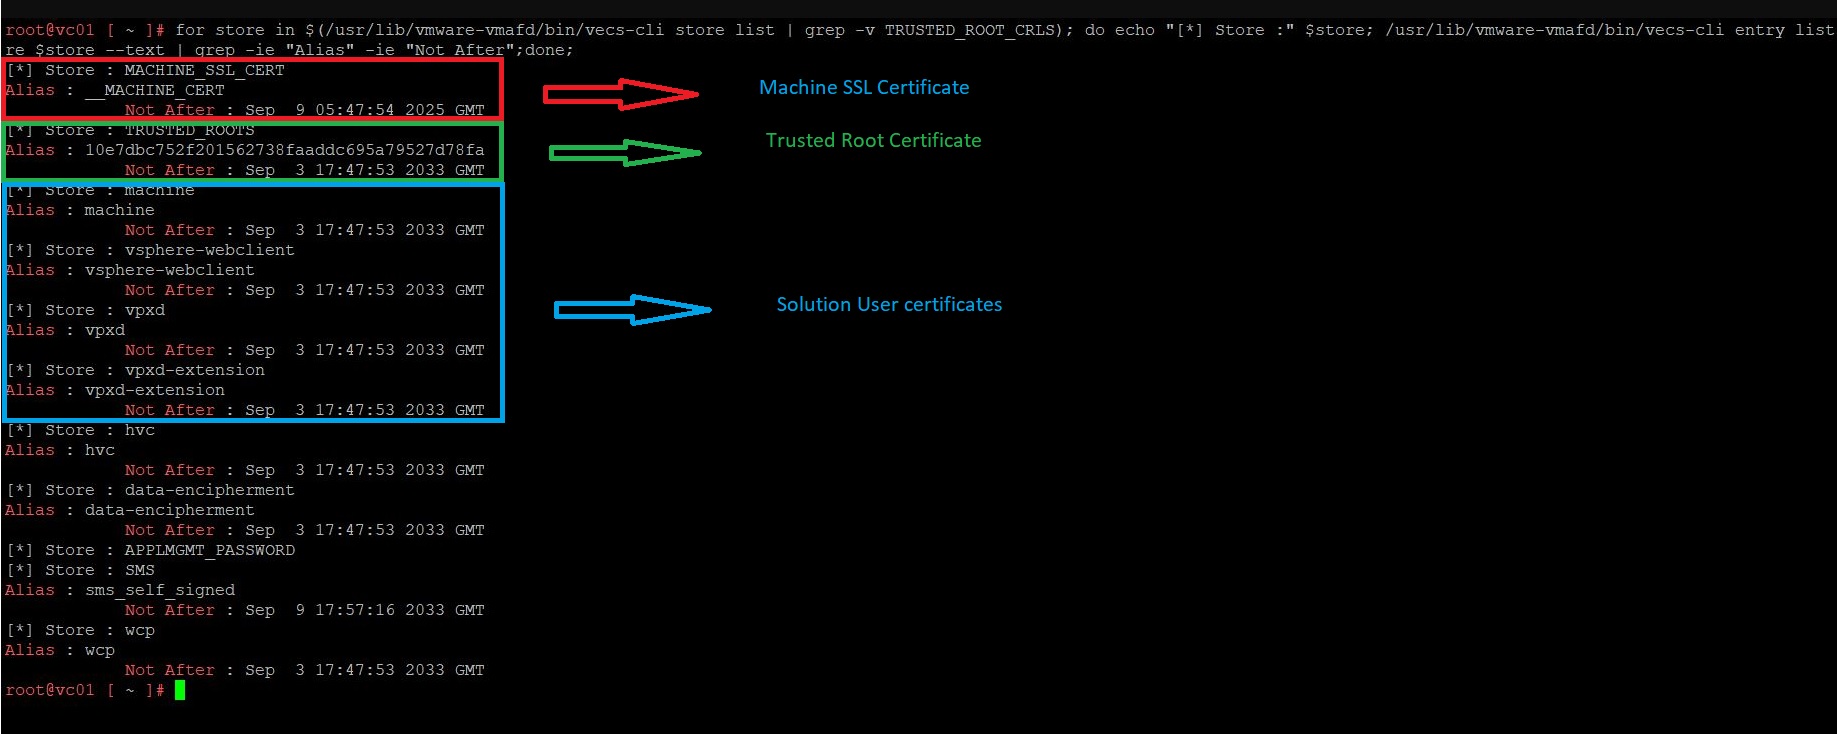
Check Cert validity from vCenter Server appliance SSH :
It is very important to understand the expiration date of your vCenter Server certificates. Run the below command to get the status of the environment’s certificates.
for store in $(/usr/lib/vmware-vmafd/bin/vecs-cli store list | grep -v TRUSTED_ROOT_CRLS); do echo "[*] Store :" $store; /usr/lib/vmware-vmafd/bin/vecs-cli entry list --store $store --text | grep -ie "Alias" -ie "Not After";done;
Check Cert validity from Web Browser:
When you open the vCenter Server URL in the web browser. You will receive a Certificate error if it is a Self-signed certificate. Click on View Certificate. This will show the Certificate’s validity.
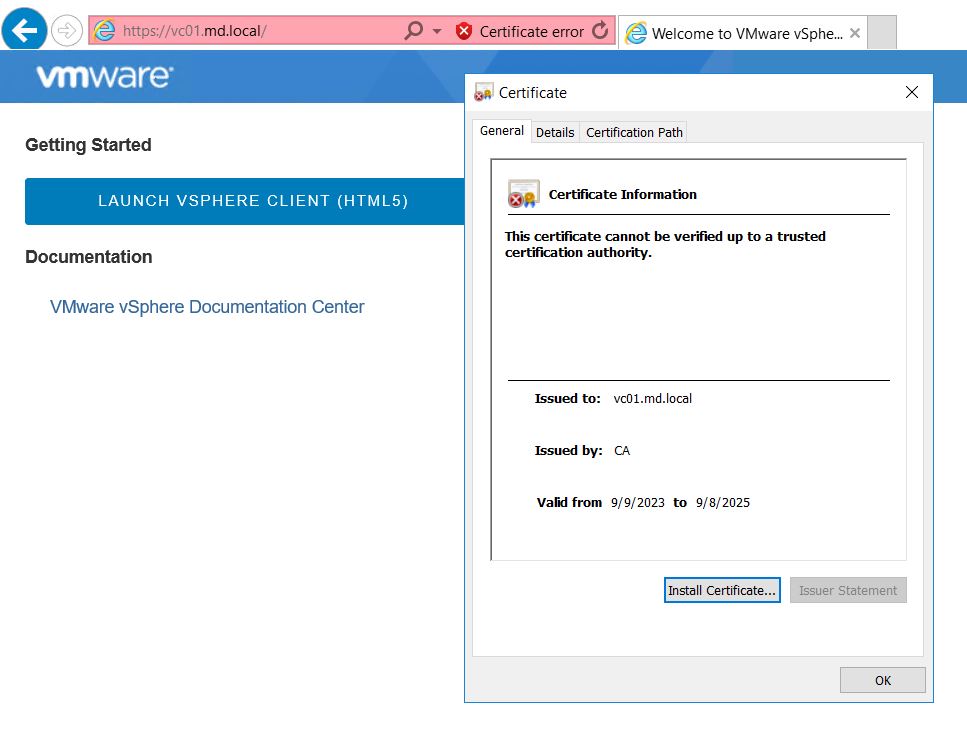
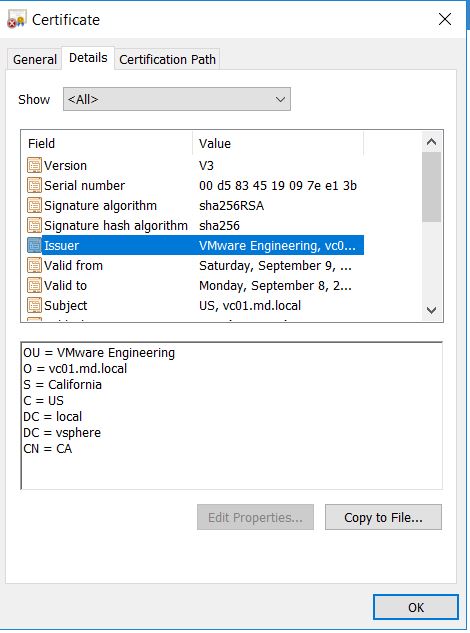
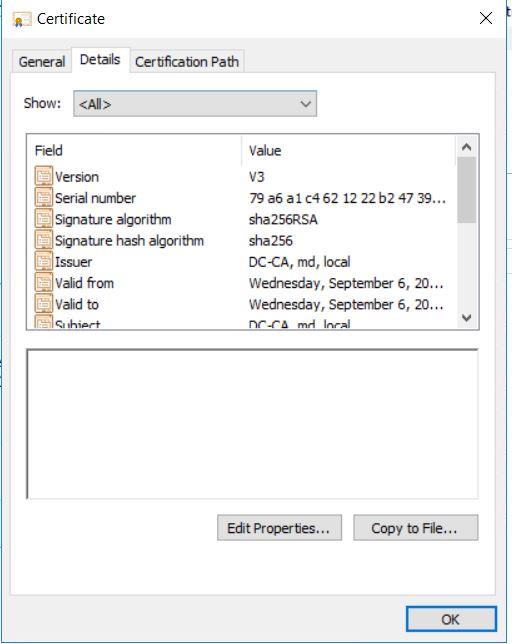
If click on Certification details, it will show you the full certificate details including the issuer, Signature algorithm, valid from and to, etc.
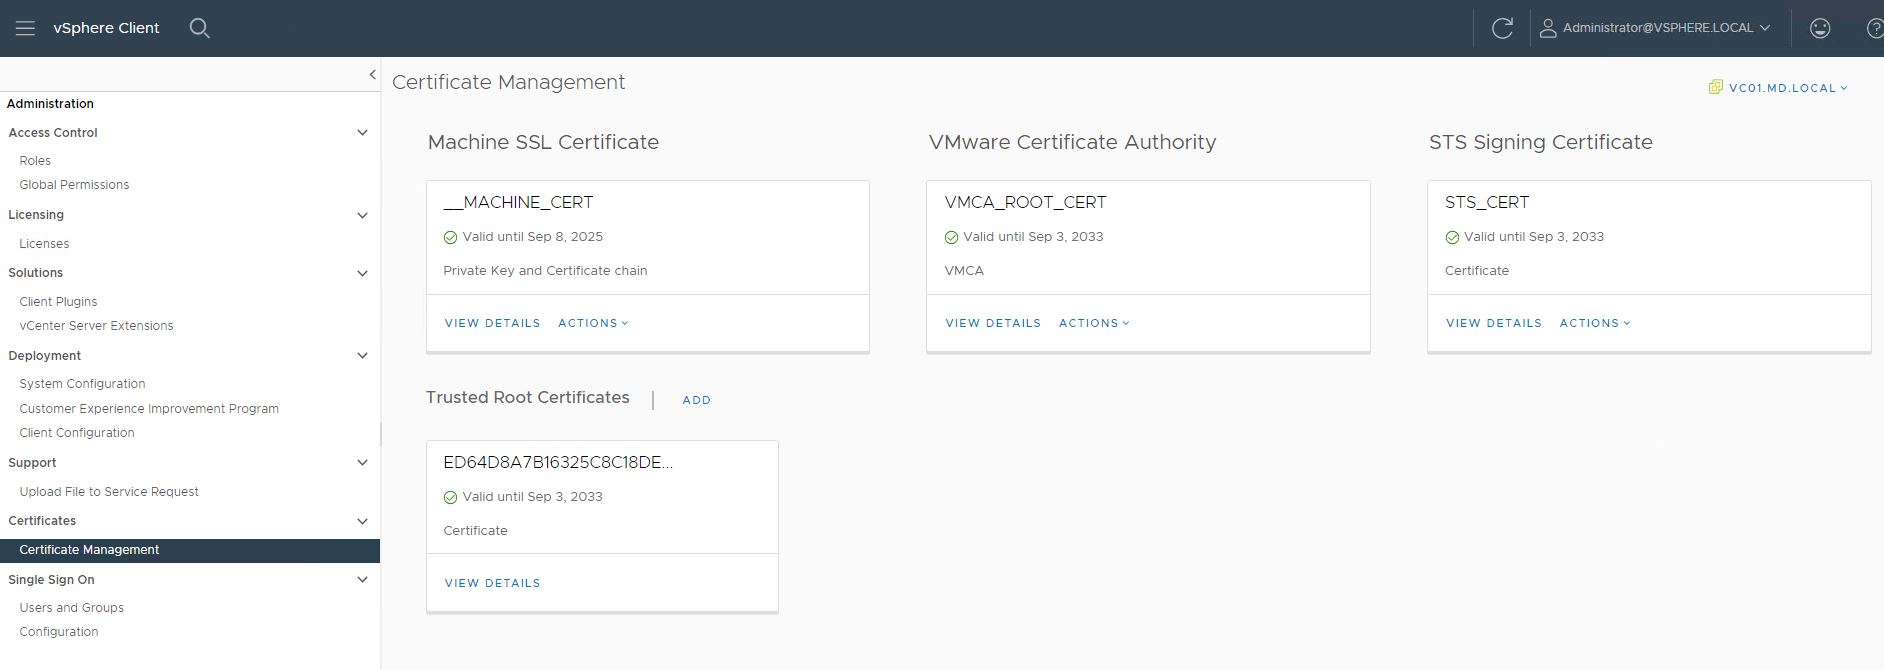
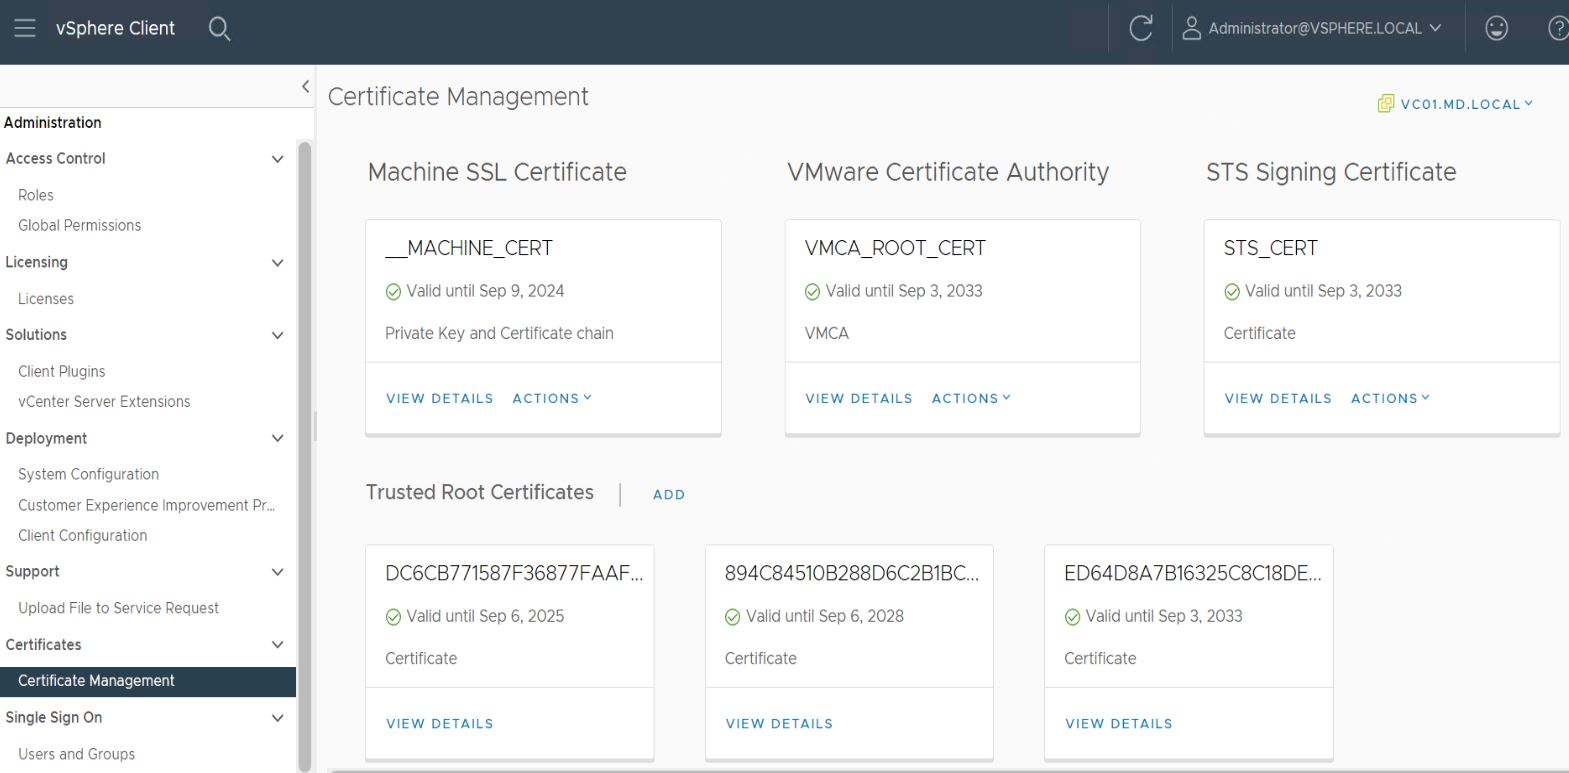
Check Cert validity from vSphere Client:
Log in to the vCenter server using vSphere Client (HTML5 client) -> Click on Administration -> Certificate Management. This will list all the vCenter server certificates.
Replace vCenter Server Self-Signed Certificate with Custom CA signed Certificate
VMware products use certificates to encrypt session information sent over Secure Socket Layer (SSL) protocol connections between components.
vCenter Server and ESXi hosts come default by Self-Signed certificates. A self-signed SSL certificate is a digital certificate that’s not signed by a publicly trusted Certificate Authority (CA).
Self-signed certificates are considered different from traditional CA-signed certificates because they are created, issued, and signed by the company or developer who is responsible for the website or software associated with the certificate, rather than a CA. These default Self-Signed certificates are not signed by a commercial certificate authority (CA) and may not provide strong security. You can replace default vCenter Server certificates with certificates signed by an Internal Microsoft CA or Commercial CA.
We will take a look at the detailed procedure for the replacement of the vCenter Server Self-signed certificate with Microsoft Custom Certificate Authority includes the below summary of actions:
1. Create vCenter Server CSR request (Certificate Signing Request)
1a. Generate vCenter CSR request from vSphere Client (UI)
1b. Generate CSR from the vCenter server “Certificate Manager” command line via SSH.
2. Submit the vCenter Server Certificate request to the Certificate Authority (CA)
2a. Submit Certificate Request to Root CA
2b. Submit Certificate Request to Intermediate CA
3. Prepare the Certificate Chain for vCenter Server Certificate Replacement
4. Upload the certificates to the vCenter Server.
5. Run the vCenter Certificate manager tool to import and replace Self-signed certs with Custom CA certs
1, How to Create vCenter Server CSR Request (Certificate Signing Request)
A certificate signing request (CSR) is one of the first steps towards getting your own SSL/TLS certificate. Generated on the same server you plan to install the certificate on, the CSR contains information (e.g., common name, organization, country) the Certificate Authority (CA) will use to create your certificate. It also contains the public key that will be included in your certificate and is signed with the corresponding private key.
A certificate signing request (also CSR or certification request) is a message sent from an applicant to a certificate authority of the public key infrastructure in order to apply for a digital identity certificate.
The CSR usually contains the public key for which the certificate should be issued, identifying information (such as a domain name) and a proof of authenticity including integrity protection (e.g., a digital signature).
There are two ways you can create CSR from the vCenter Server:
1a. Generate vCenter CSR request from vSphere Client (UI)
1b. Generate CSR from the vCenter server “Certificate Manager” command line via SSH.
1a. Generate vCenter CSR from vSphere Client (UI)
Log in with the vSphere Client to the vCenter Server using administrator@vsphere.locaI.
From the Home menu, select Administration. Under Certificates, click Certificate Management.
For the certificate that you want to replace, under Machine SSL Certificate, click .
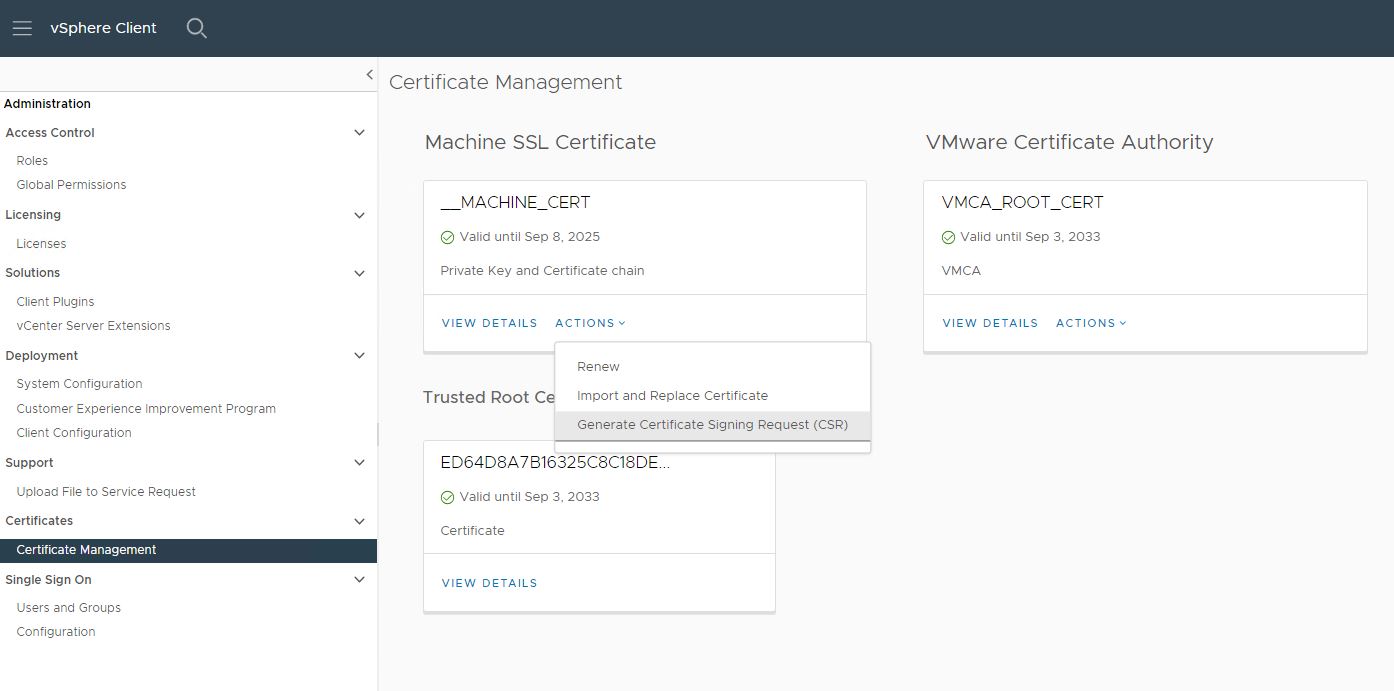
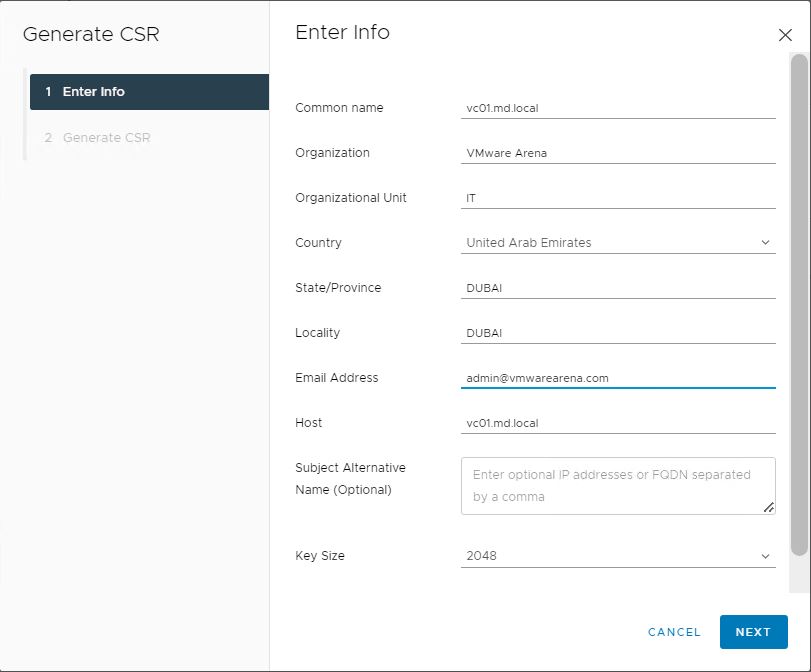
Enter the below details to generate a CSR. Leave Common name and host as default. The common name and host are the fqdn of vCenter Server.
Specify the other details like organization, organization unit, country, state, locality, email address, and key size. Click Next
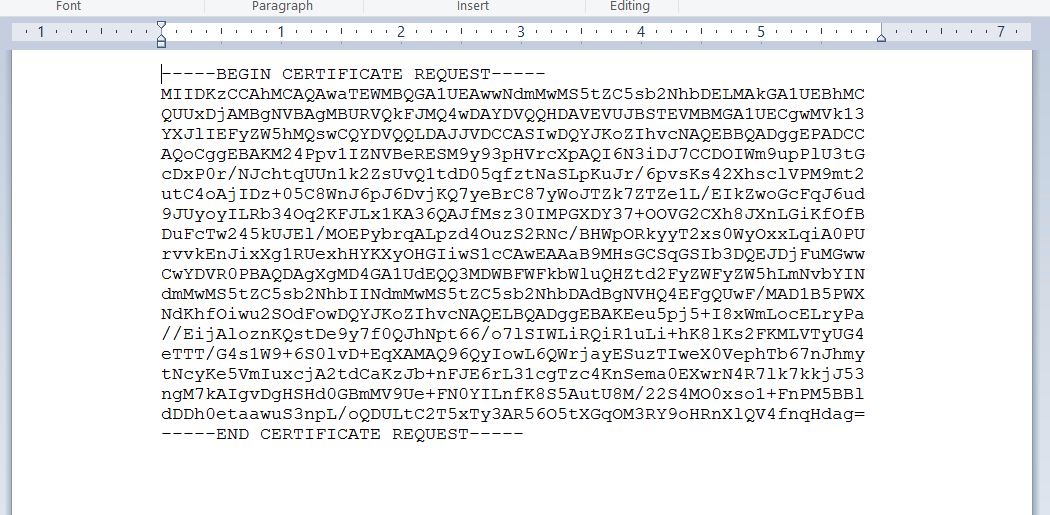
Click Copy to save the content of CSR in the file or click Download to download the CSR file of the vCenter Server.
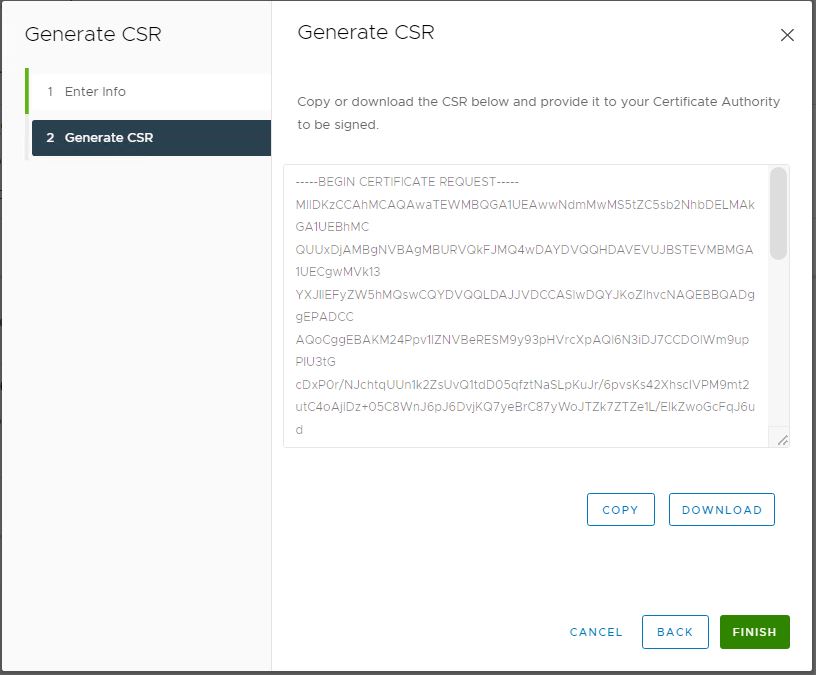
If you download the file. The file will be in “.csr” format.
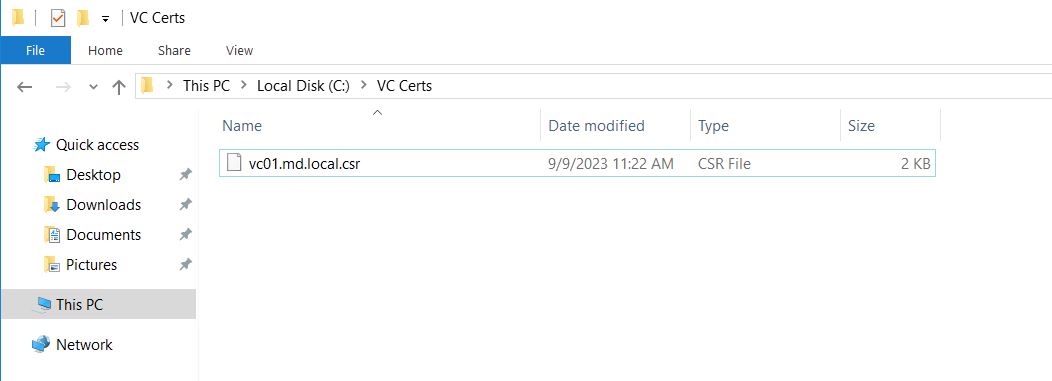
It looks like the.CSR was created successfully but the private key is not shown and don’t have the option to download the private key in the CSR step when you generate CSR from the vSphere client UI.
The private key is stored inside the VECS certificate store under the __MACHINE_CSR alias. It would have been better if VMware had shown the user a notification in the vSphere Client when a . CSR is generated. But No worries, I will explain how to get the Private key for the CSR request.
How do get a Private Key when generating CSR from vSphere Client?
To obtain the private key, log in to vCenter Server Appliance using SSH and run the below command:
/usr/lib/vmware-vmafd/bin/vecs-cli entry getkey --store MACHINE_SSL_CERT --alias __MACHINE_CSR > /path/filename.keyCopy this private key to a notepad file and save it as private.key. Now this file can be used while importing the validated certificate file into the vSphere Client.
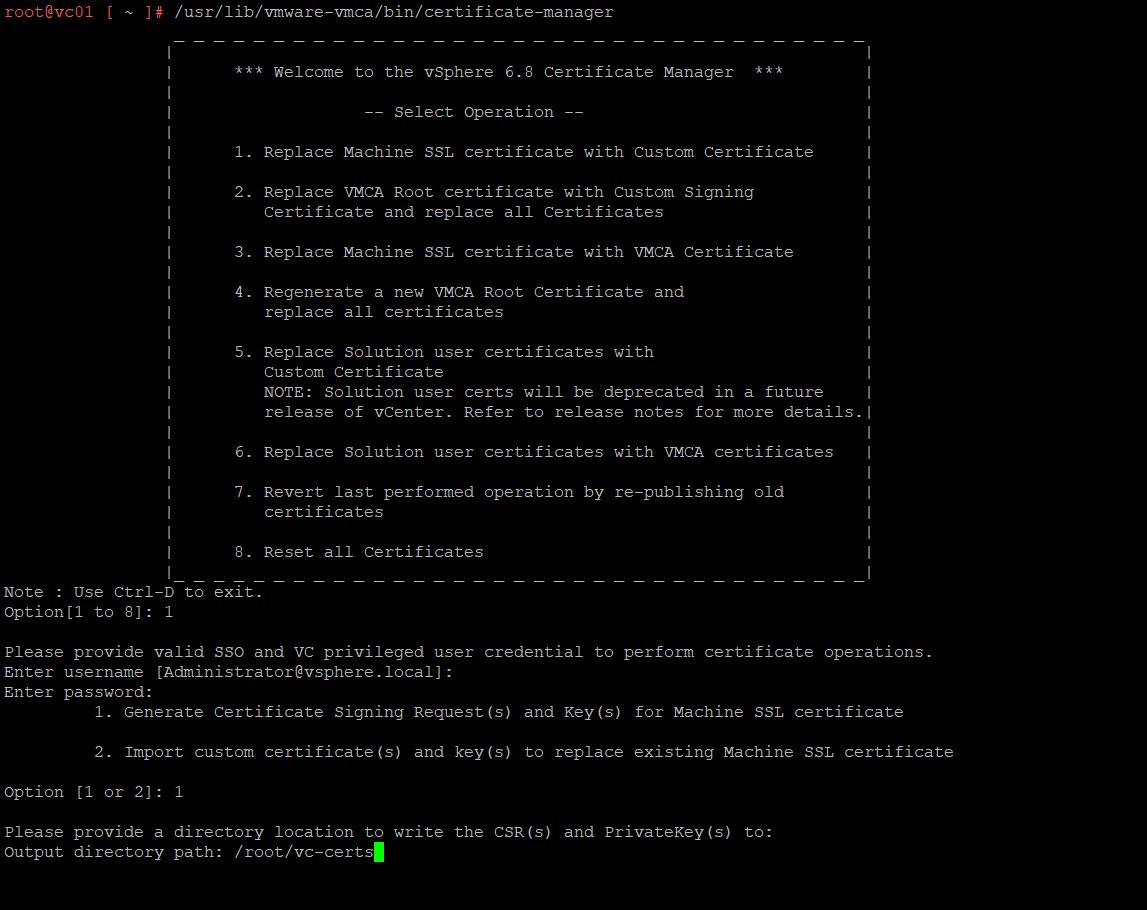
1b. Generate vCenter Server CSR from Certificate Manager tool from CLI
To Generate CSR from the certificate manager tool. Login to vCenter Server Appliance via SSH and run the below command:
/usr/lib/vmware-vmca/bin/certificate-manager
Choose option “1” – “Replace Machine SSL certificate with Custom Certificate.”
Again, choose option “1” – “Generate certificate signing request(s) and Key(s) for machine SSL Certificate.”
Specify the output directory path: /root/vc-certs. It can be any folder in the VCSA directory.
Provide the below parameters during the vCenter Server CSR generation:
| Property | Value |
| Country | Leave Default, specify own. In our example, AE (Arab Emirates), Only 2 Letters are allowed. |
| Name | FQDN of vCenter Server Example, vc01.md.local |
| Organization | Default, specify own. For example, VMware Arena |
| OrgUnit | Default, specify own. Example, IT |
| State and Locality | Default, specify own. Example, Dubai |
| IPAddress | Specify the IP address of the vCenter Server. |
| Hostname | FQDN of vCenter Server Example, vc01.md.local |
| VMCA Name | FQDN of vCenter Server Example, vc01.md.local |
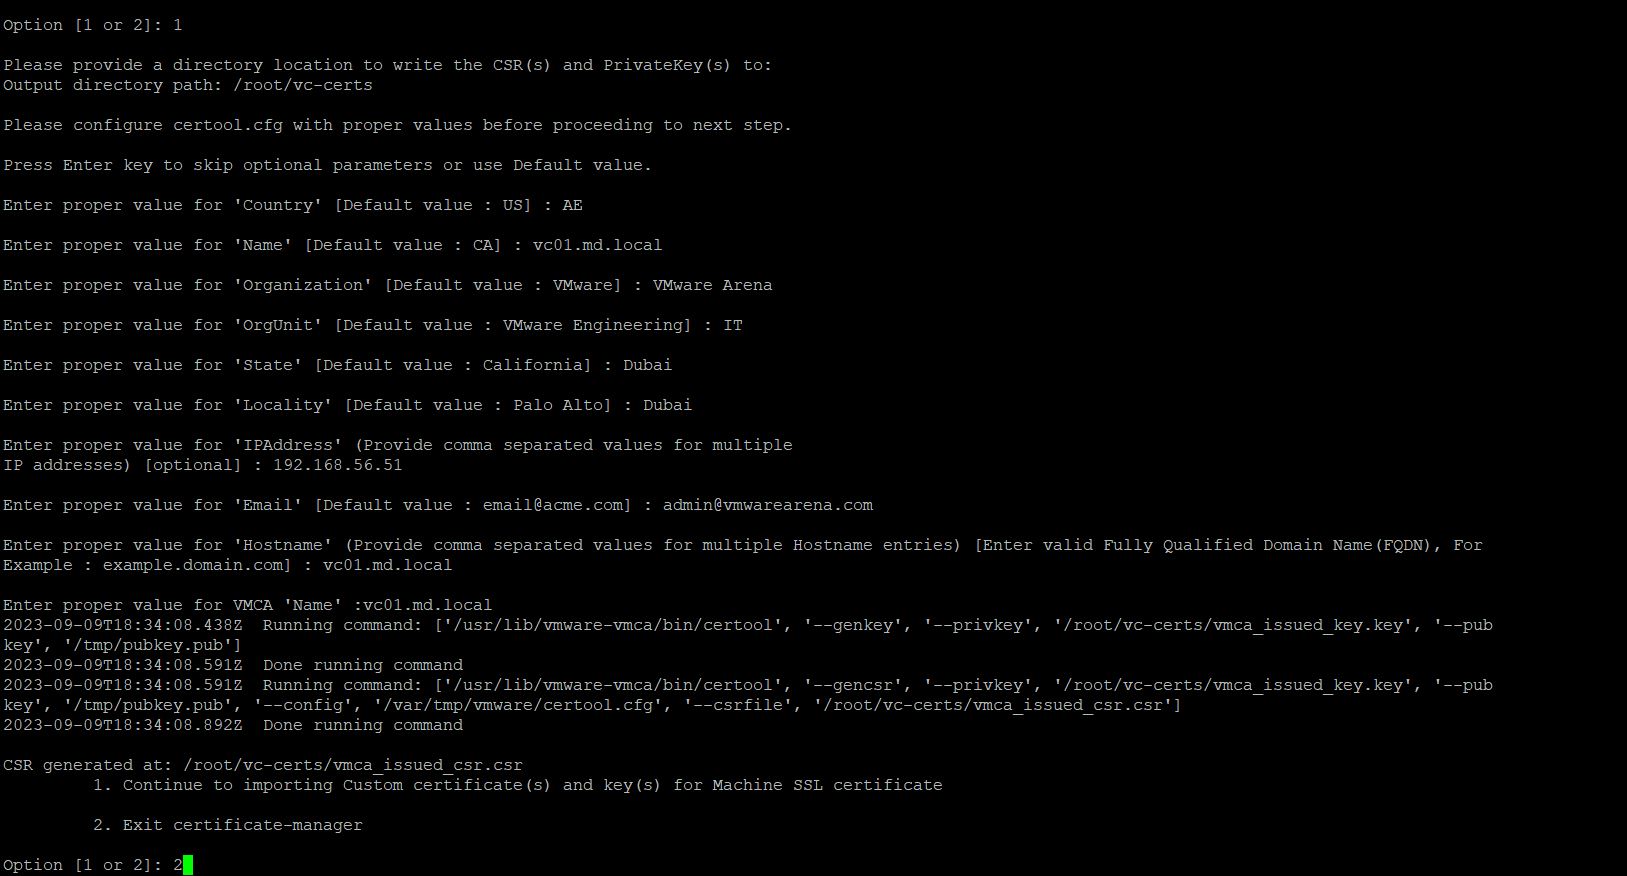
vCenter server CSR File is generated and stored in the specified output location. In my case “/root/vc-certs”.
The default CSR file name is vmca_issue_csr.csr Along with the CSR file, a private key file is also generated and saved in the same location. The private key file name is “vmca_issues_key.key”.
The private key will be automatically generated when you generate CSR with the certificate manager tool in CLI.
Valid the CSR and private key file by browsing towards the specified output location.

2. How to submit a vCenter Certificate request to the Microsoft Certificate Authority (CA)
Digital certificates created by a Public Key Infrastructure (PKI) Certificate Authority (CA) are verified using a chain of trust. The trust anchor for the digital certificate is the Root Certificate Authority (CA), and any Certificate Authority (CA) that comes under Root Certificate Authority (Root CA) is known as a subordinate Certificate Authority (CA) or Intermediate Certificate Authority.
In this blog, we will discuss how to submit vCenter Server Certificate requests to both Microsoft ROOT CA and Microsoft Intermediate CA.
2a. Submit vCenter Certificate request to Microsoft ROOT CA
Download the CSR file (VMCA_Issued_CSR.CSR) with WinSCP and keep it saved in your desktop system to request a CA signed certificate for your vCenter server.
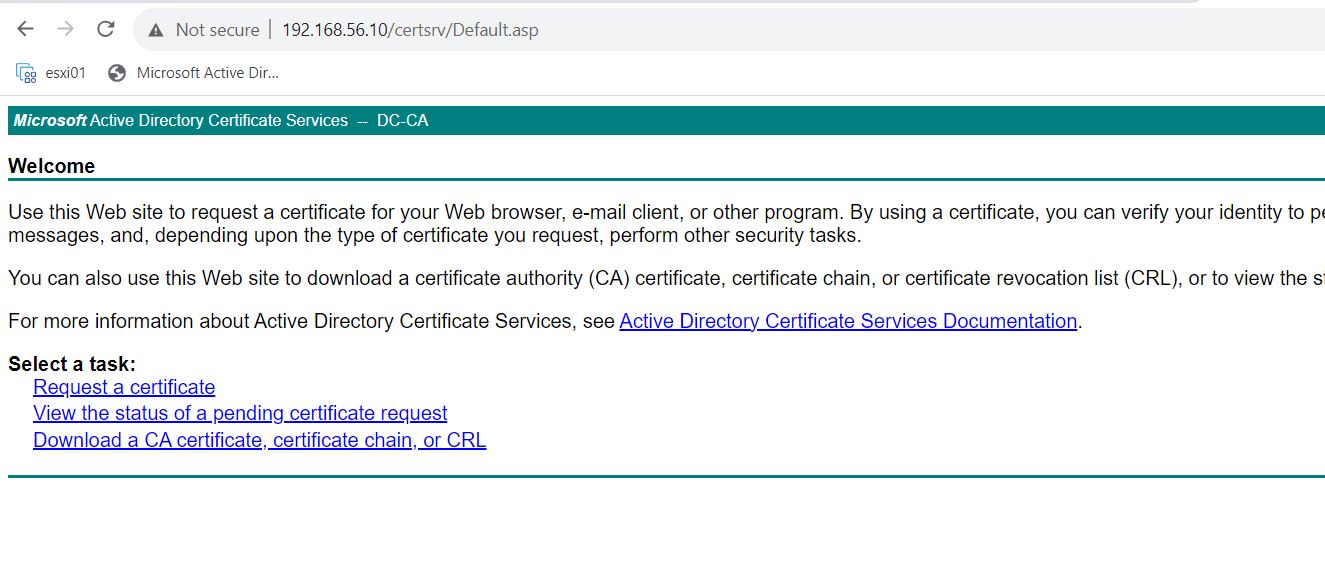
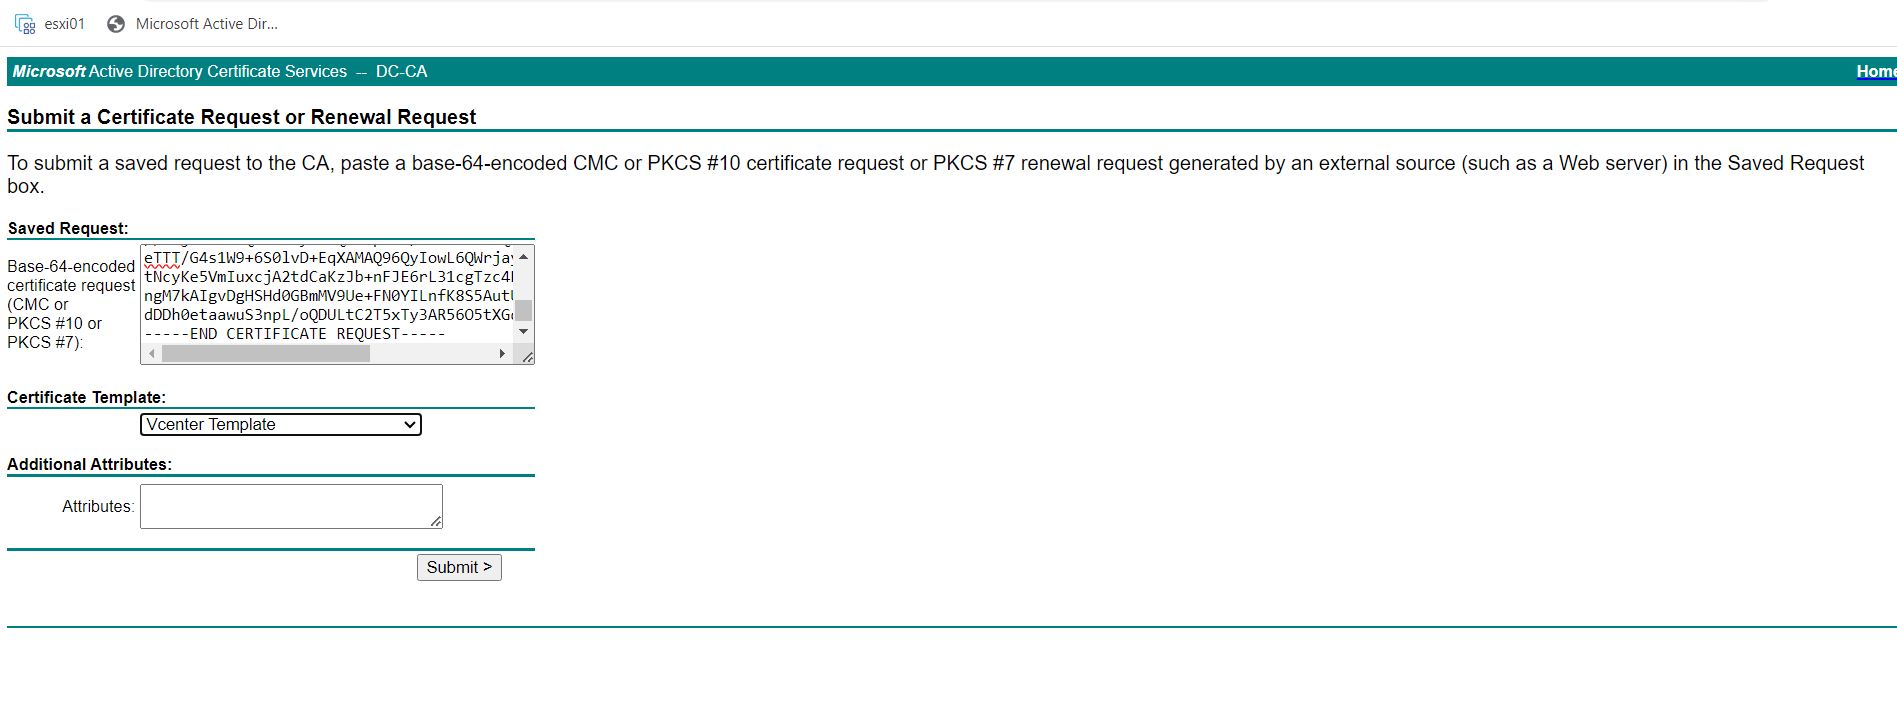
Login to http://CA/certsrv and click Request a Certificate
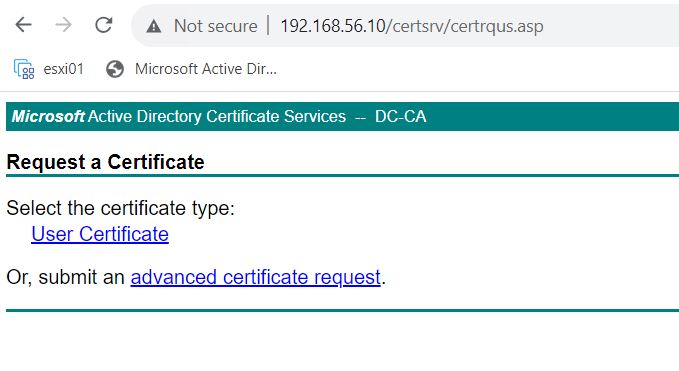
 Click ” Submit an Advanced Certificate Request”
Open the CSR file “vmca_issue_csr.csr” and copy the full contents of the file.
Paste the contents of the .csr file and Select the “vCenter template” from the certificate template drop-down. In my case, I have cloned the web server template and created a new certificate template called the “vCenter template” in my CA. It won’t be present by default. In your case, you can select “Web Server” from the certificate template drop-down.
Click Submit.
Select Base 64 encoded and click Download Certificate.
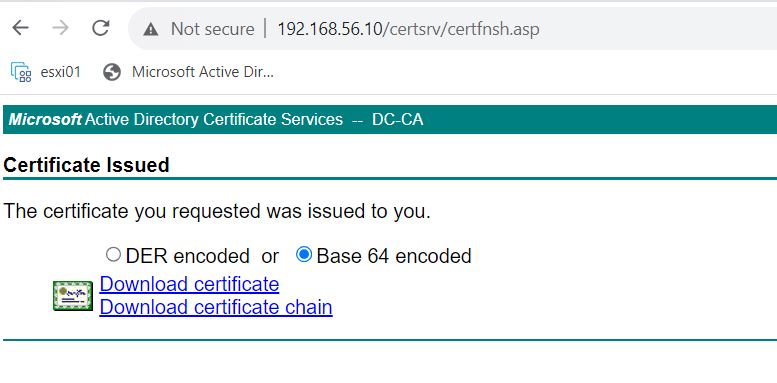
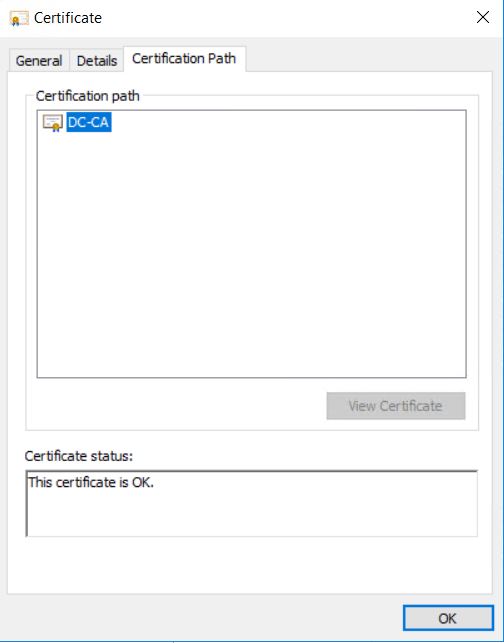
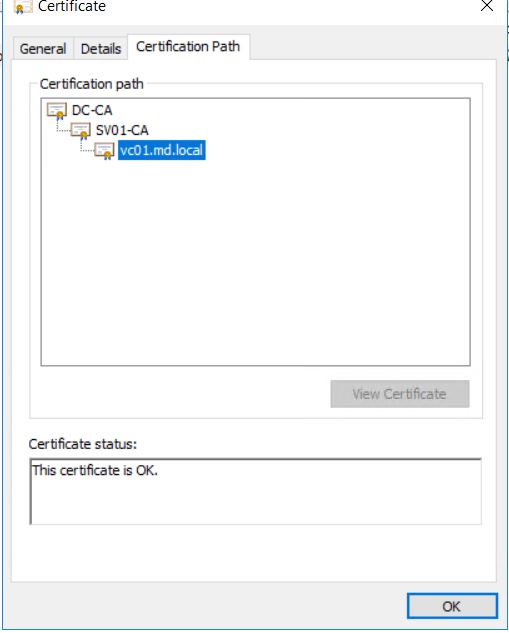
If you open the downloaded certificate, you can check the Certificate Path/Chain, it shows the full certificate path DC-CA (Microsoft Certificate Authority) -> vc01.md.local (vCenter Server)
It is required to generate the custom CA certificate with a full chain. This is important as VCSA will import the customer root and intermediate CA certificate (If present) from the full chain. You can go back to the page in Microsoft Certificate Service page and select “Download a CA certificate (root certificate).”
I have saved the root-cert as “root-cert” in the local folder.
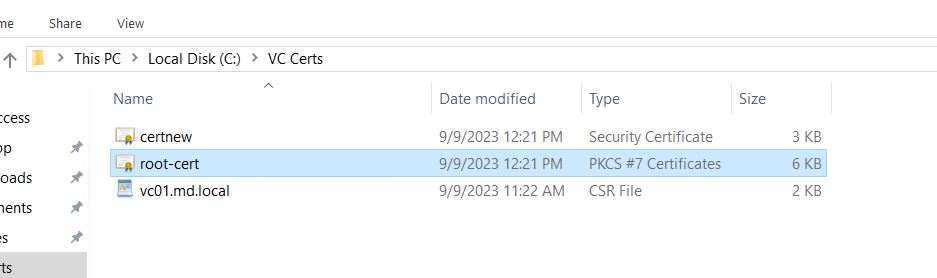
If you open the root certificate, it will show the certification path.
2b. How to Submit vCenter Certificate Request to Microsoft Intermediate Certificate Authority
In most organizations, Certificates will be issued by the intermediate Certificate Authority (CA) not directly from the ROOT CA. This is for security reasons.
Subordinate CAs – these live between the root and end entity certificates and their main purpose is to define and authorize the types of certificates that can be requested from the root CA.
We will also look at how to submit a CSR file to the Intermediate certification authority (CA) and generate CA signed certificate for the vCenter Server.
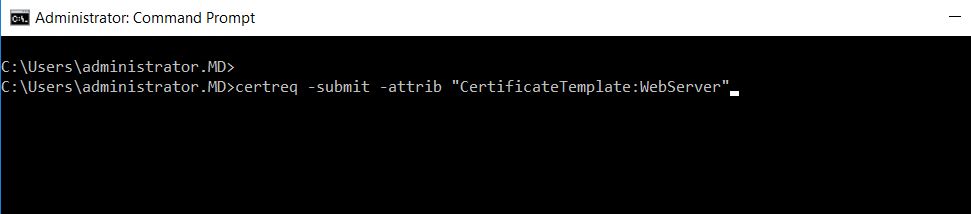
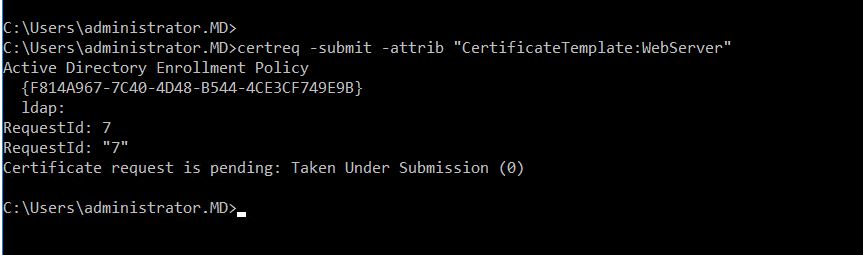
Login to your Microsoft Intermediate Certificate authority and run the command:
certreq -submit -attrib "CertificateTemplate:WebServer"
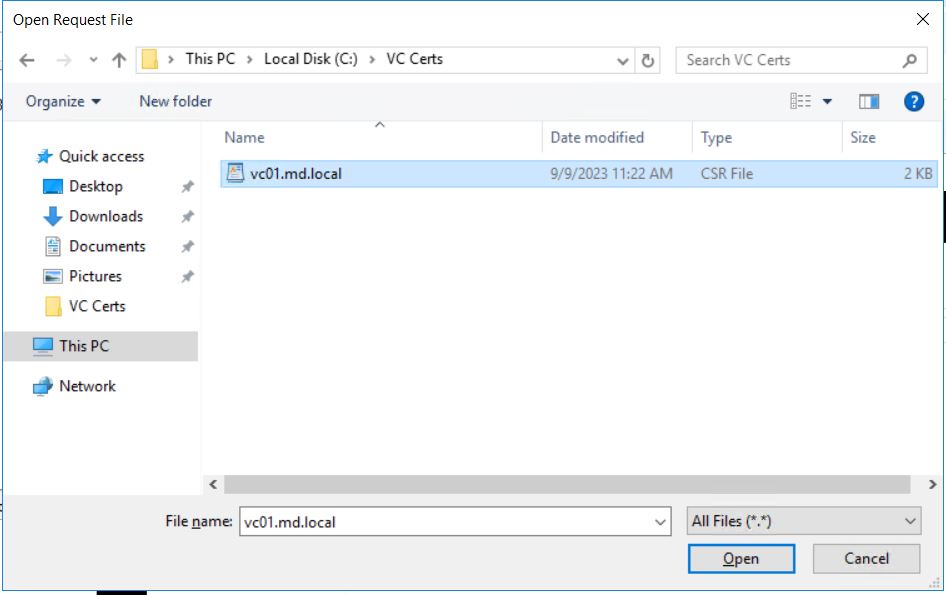
Select the vCenter Server CSR (.csr) file saved in the local folder and click open.
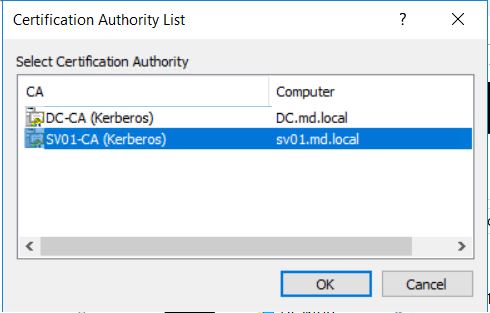
This triggers the Certification Authority window to open. Select the Certification Authority to use (In my case sv01-CA is my sub-ordinate CA server) and click OK.
The certificate Request has been successfully submitted to Intermediate CA and the Request ID is “7”
Open Certificate Authority MMC on your subordinate CA server. You can see the certificate request number “7” under “pending requests.”

Under the pending request, Right-click the certificate request number “7” -> All tasks -> click “Issue”
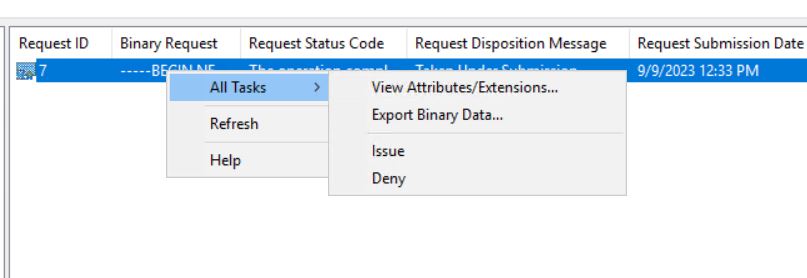
Once the certificate is issued by CA certificate request ID “7” will appear under “issued Certificates”.

Double-click the certificate in the “Issued Certificates”. It opens up the certificate and click “Copy to file” under details which in turn opens up the certificate export wizard. Click Next.
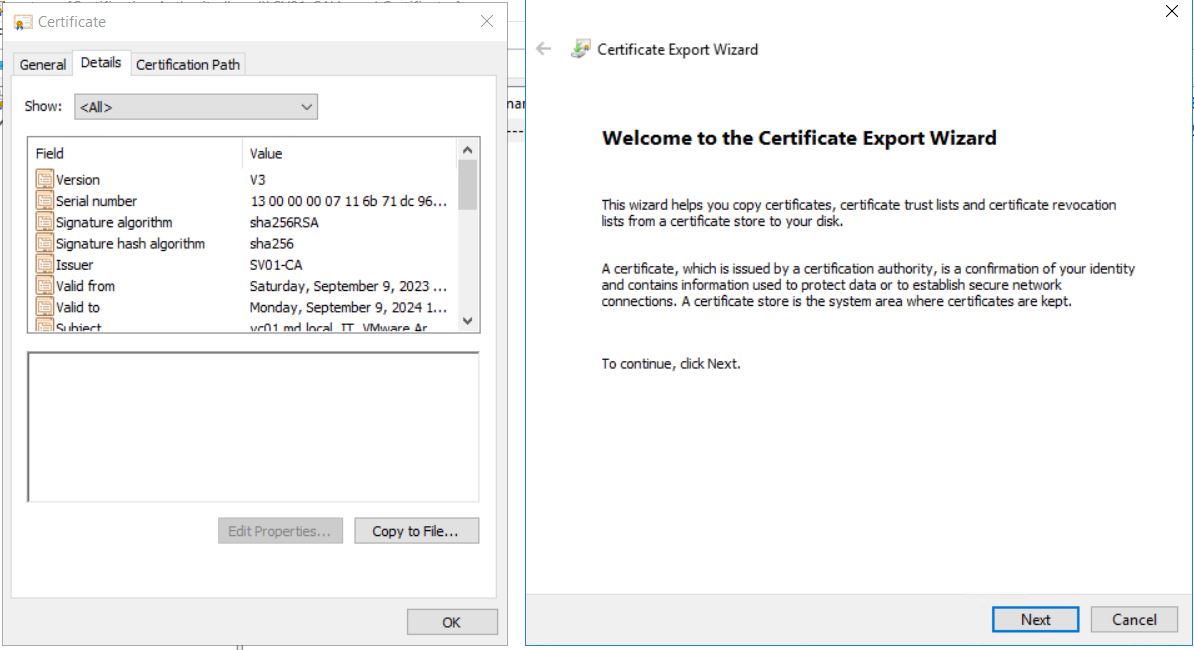
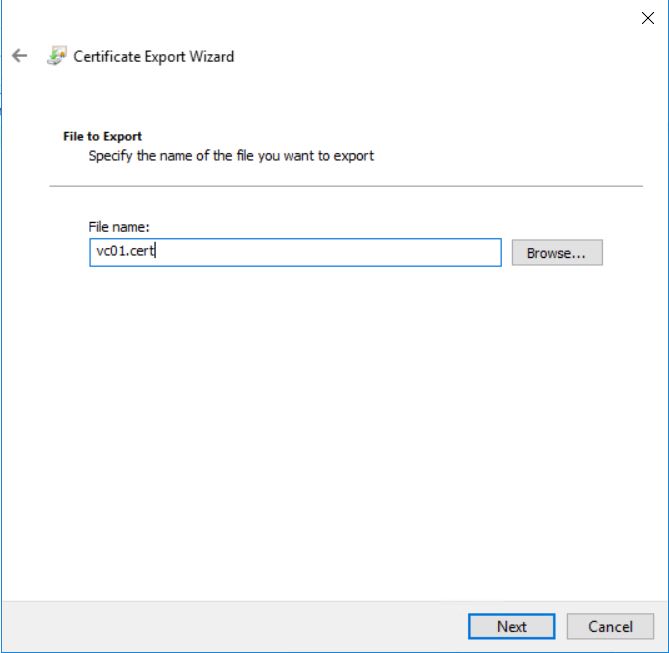
Specify the certificate file name. In my case “vc01.cert” and click Next.
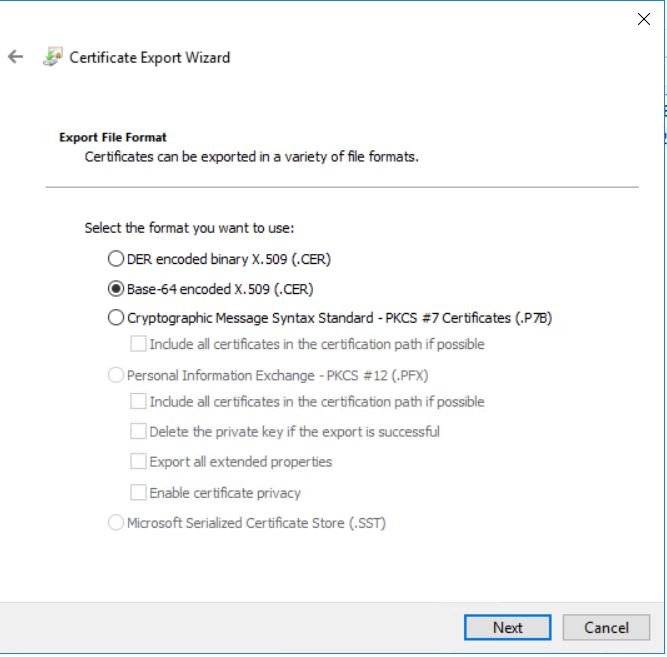
Select the “Base-64 encoded X.509 (.CER) format” file format in the format list and click Next.
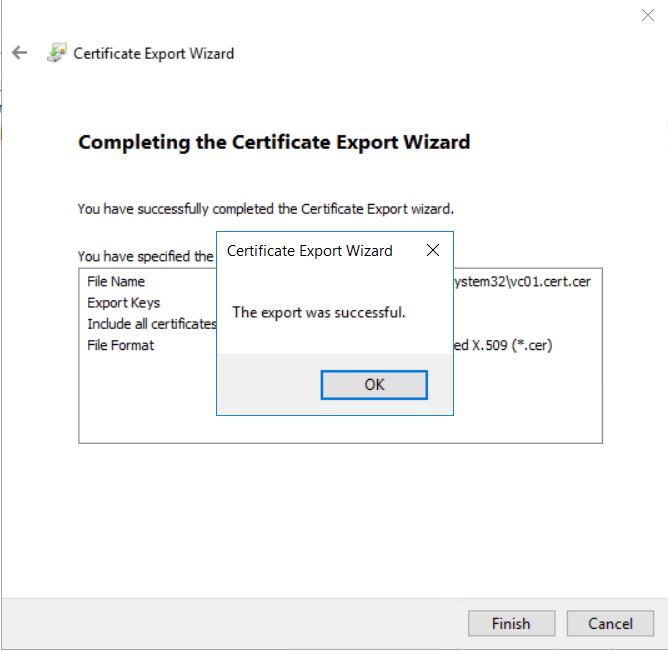
You will receive the popup ” The export was successful” and Click OK.
If you open the exported certificate “vc01.cer”, you can now see the full certificate chain which includes ROOT CA -> Subordinate CA -> vCenter Server.
It is also important that you need to export the certificate of root and subordinate CA using the same procedure as above. to export ROOT CA certificate. Click ROOT CA (DC-CA) and “View certificate”
Click Details. select “Copy to File” and export the certificate using the certificate export wizard.
Save generated VC CA certificate, ROOTCA, and Subordinate CA cert files.
 3. Prepare the Certificate Chain for vCenter Server Certificate Replacement
During the import of the new vCenter certificate, you need to import the certificate chain with a single file. Therefore, the below steps are very important steps when you are using multiple CAs like Root CA and Intermediate CA.
Just to summarize, I have put down the table of what each file contains after this certificate chain file creation.
| Type | Path |
| Machine certificate | Contains full chain of contents of machine certificate (generated from a certificate authority), RootCA, and subordinate CA certificates. |
| Key File machine SSL | A private key file was generated during the VC CSR request. |
| Signing certificate | Contains chain of contents of RootCA and Subordinate CA |
Follow the below steps in order:
- Open the exported subca.cer (intermediate certificate file) with notepad.
- Highlight and Copy everything in the open doc.
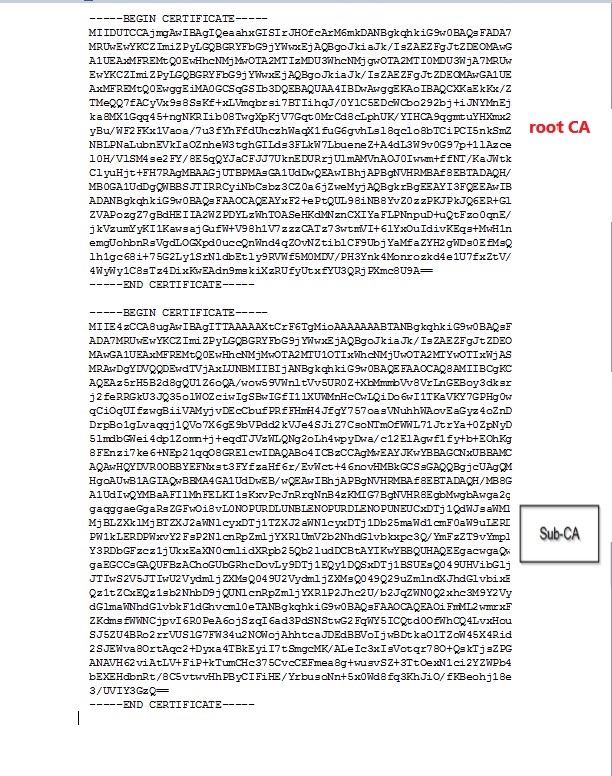
- Open the Rootca.cer file with Notepad and paste the information from the Intermediate.cer file to the bottom of the root.cer file.
- Save the Rootca.cer file but don’t close it. Root.cer File should look like the below example.
-----BEGIN CERTIFICATE-----
ROOT CERTIFICATE
-----END CERTIFICATE-----

-----BEGIN CERTIFICATE-----
INTERMEDIATE CERTIFICATE (IF YOU HAVE ONE)
-----END CERTIFICATE-----
- Select and copy all text in the Root.cer
- Open the generated VC Machine Certificate “vc01.cert” file with Notepad.
- Paste the copied text from Root.cer file to the bottom of the doc
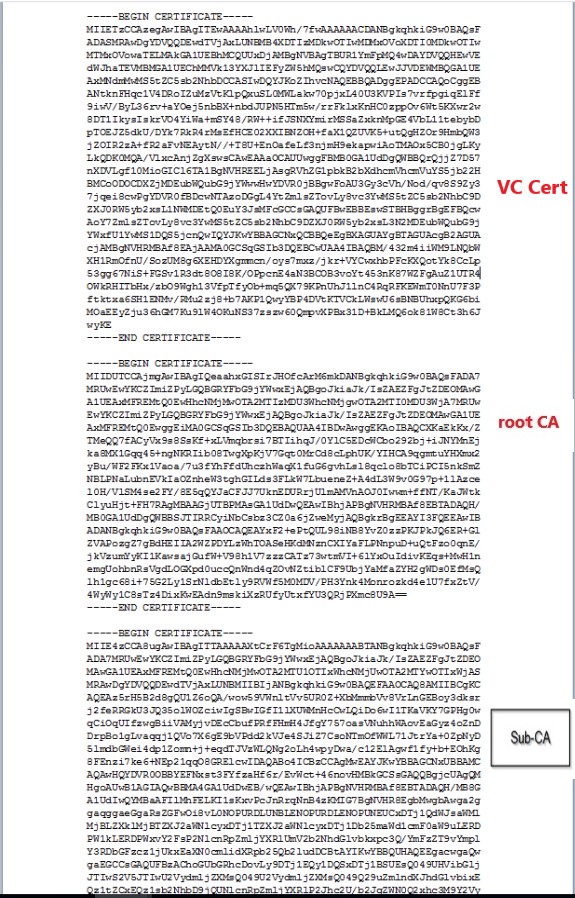
- You will now have the full chain and three certs embedded. VC Machine cert -> ROOT CA -> SUB CA
- Save the MachineCertificate file “vc01.cert“. vc01.cert file Should be like the below example.
-----BEGIN CERTIFICATE-----
MACHINE CERTIFICATE (VCENTER CERTIFICATE)
-----END CERTIFICATE-----

-----BEGIN CERTIFICATE-----
ROOT CERTIFICATE
-----END CERTIFICATE-----

-----BEGIN CERTIFICATE-----
INTERMEDIATE CERTIFICATE (IF YOU HAVE ONE)
-----END CERTIFICATE-----
4. Upload the certificates to the vCenter Server.
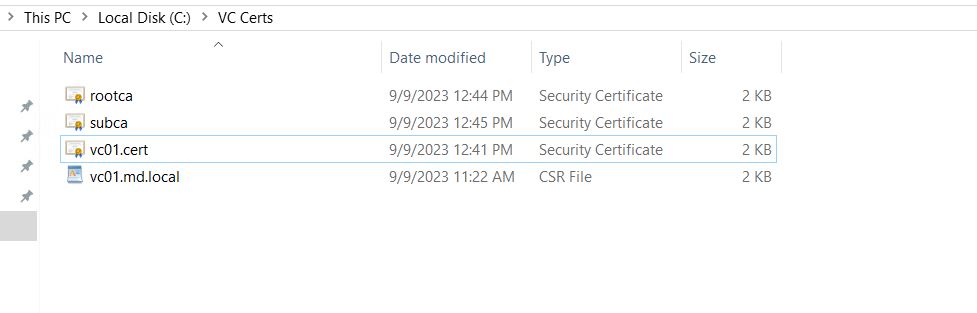
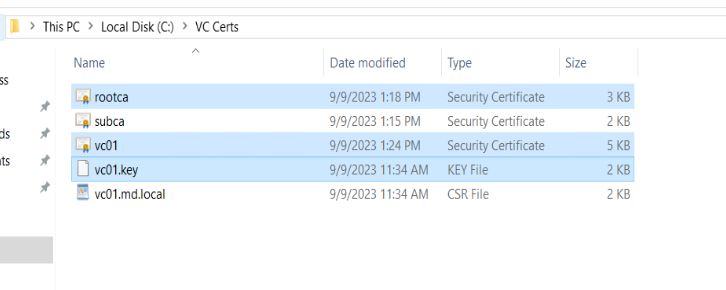
Once all the certification chains and files are updated as mentioned in the above steps. Now copy the below 3 highlighted files to the vCenter server appliance via WinSCP.
- rootca.cer (Contains chain of contents of rootCA and Subordinate CA)
- vc01.cer (contains the full chain of contents of machine certificate, rootCA, and subordinate CA)
- vc01.key (private key generated during CSR request)
5. Run the vCenter Certificate manager tool to import and replace Self-signed certs with Custom CA Certificates
I have copied the above-mentioned 3 files to the directory “/root/finalcerts” in the vCenter server appliance.
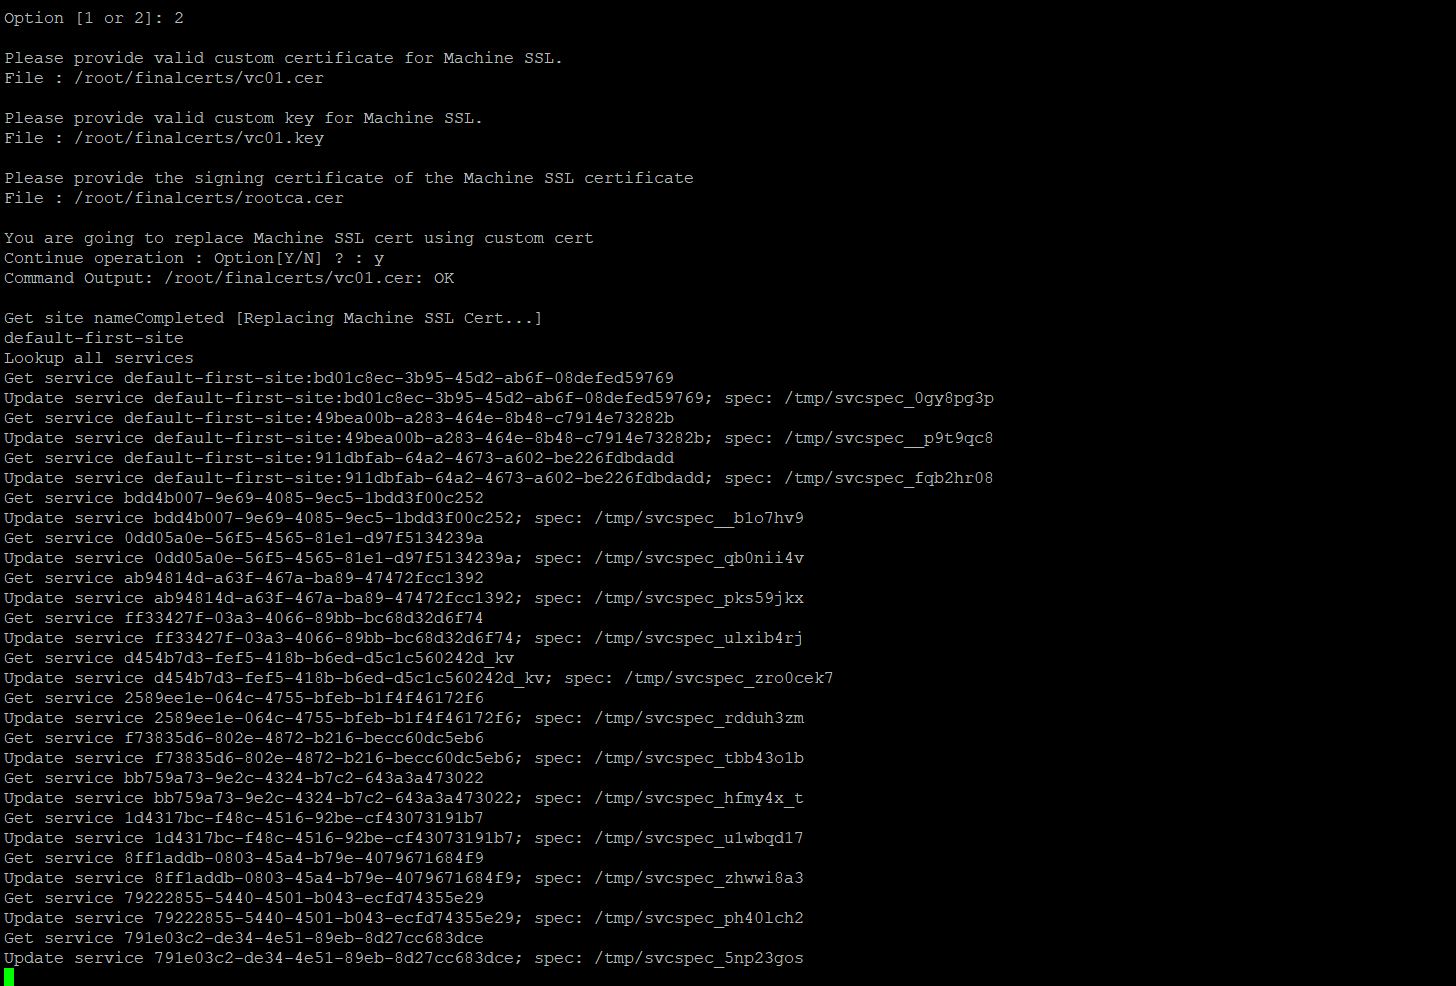
To import the new CA signed certificate from the certificate manager tool. Login to vCenter Server Appliance via SSH and run the below command:
Choose option “1” – “Replace Machine SSL certificate with Custom Certificate.”
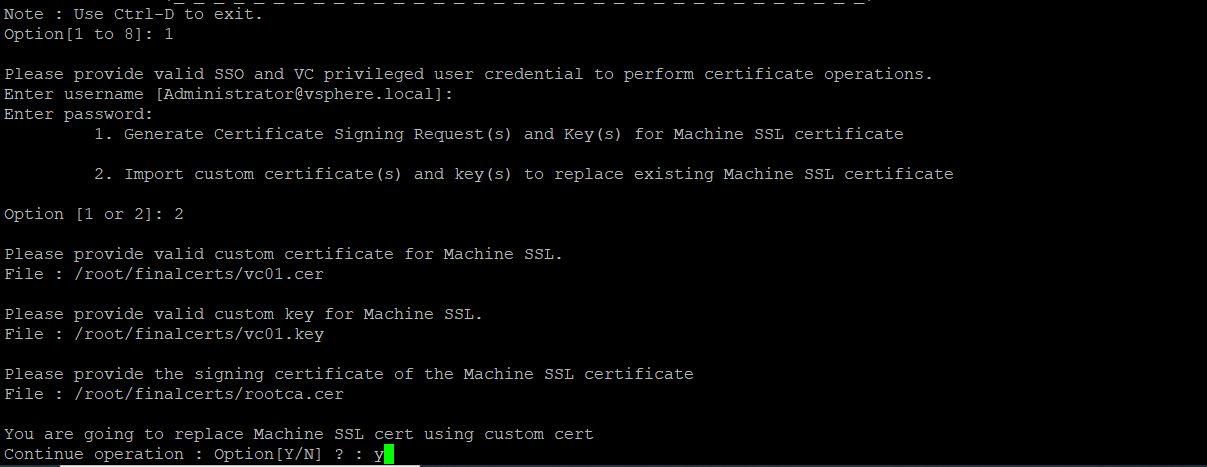
Then, choose option “2” – “Import Custom Certificate (s) and key(s) to replace existing Machine SSL Certificate.”
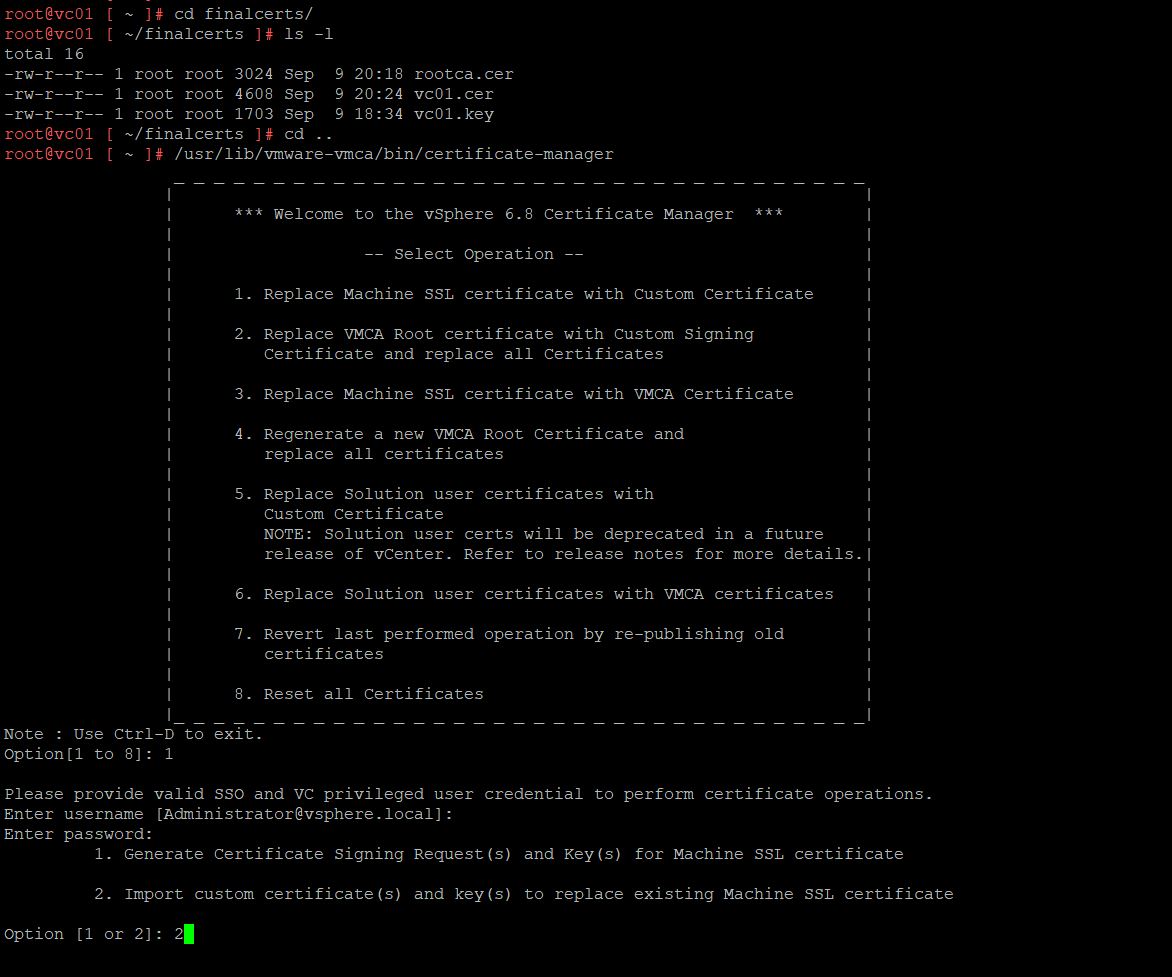
Specify the location of the Machine certificate, key file, and signing certificate as below:
| Type | Path |
| Machine certificate | /root/finalcerts/vc01.cer (Contains full chain of contents of machine certificate, RootCA, and subordinate CA |
| Key File machine SSL | /root/finalcerts/vc01.key (Private key file generated during the VC CSR request) |
| Signing certificate | /root/finalcerts/rootca.cer (Contains chain of contents of rootCA and Subordinate CA) |
Hit enter and Type “Y” to proceed to replace the Machine SSL certificate with the Custom CA certificate
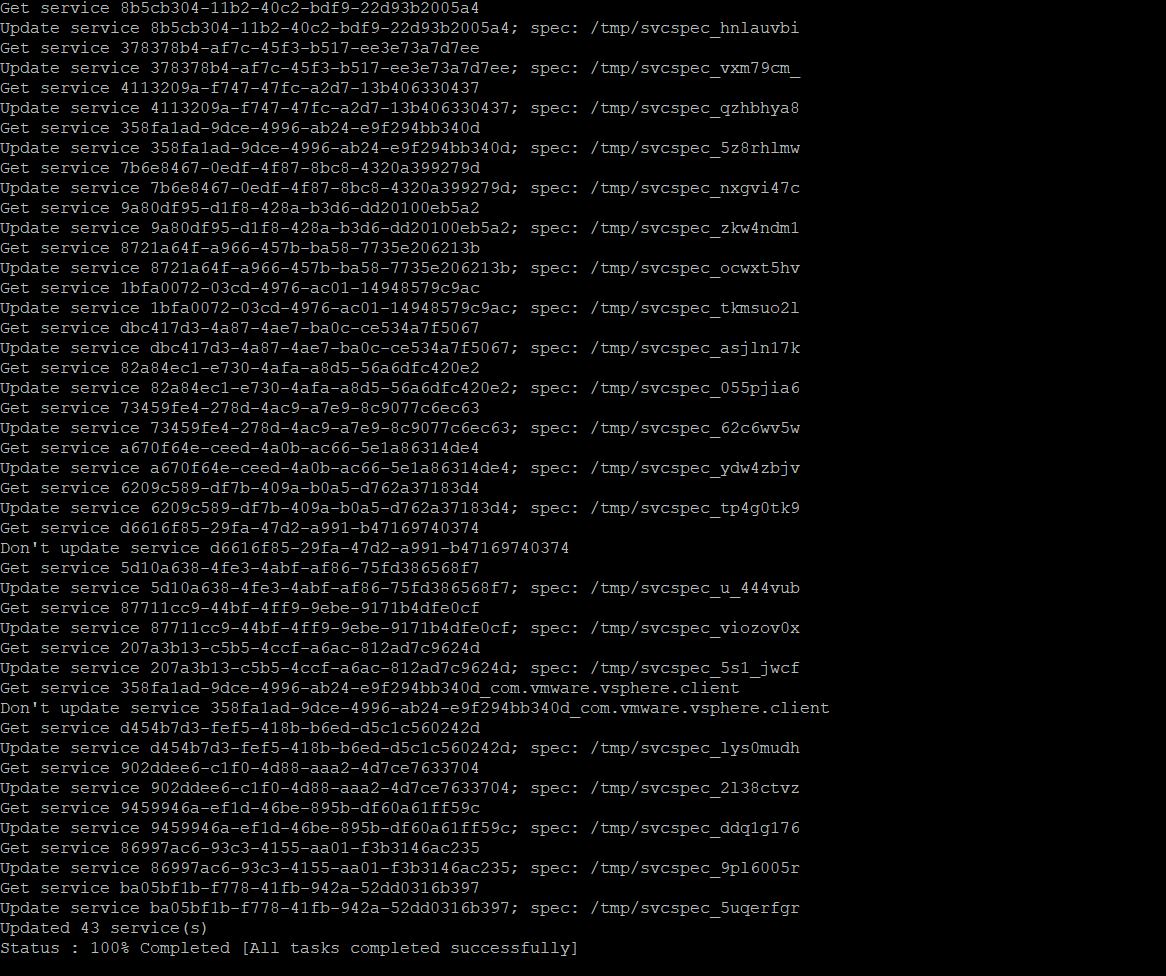
Services will be updated with the new custom certificate, therefore the vCenter server services will be restarted.
This process will restart all the vCenter Services. You can notice that “100% completed [All tasks completed successfully)
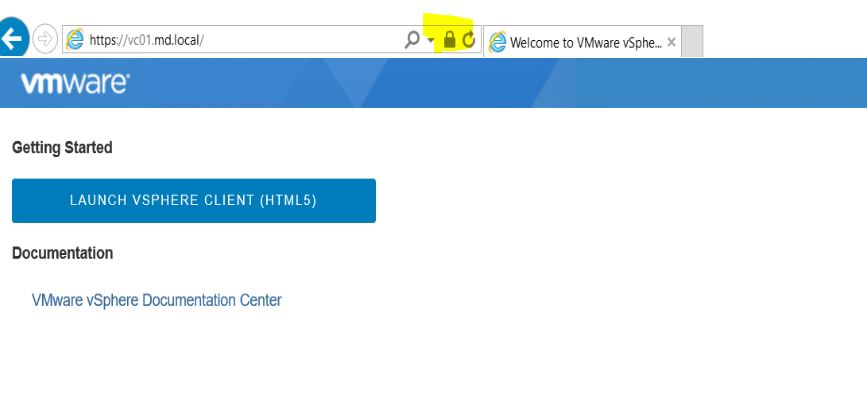
After the vCenter Server Self Signed Certificates (SSL) certificates are replaced with Custom CA signed certificates, try to access the vCenter Server using the Web browser. You no longer see the Certificate error in the browser. You can see the Lock symbol which is nothing but a secure site.
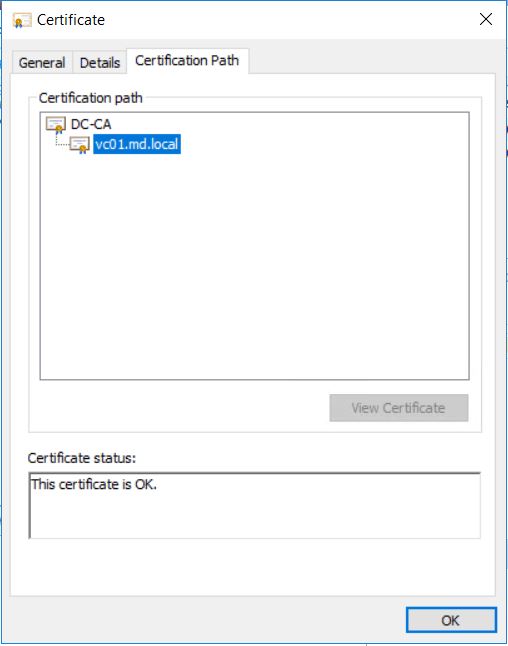
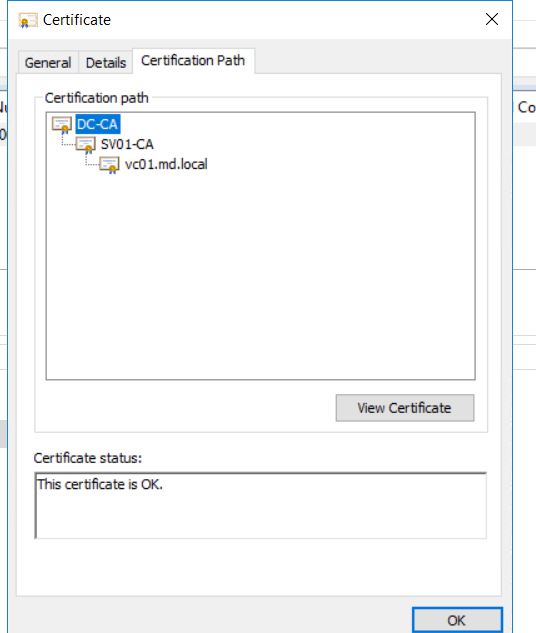
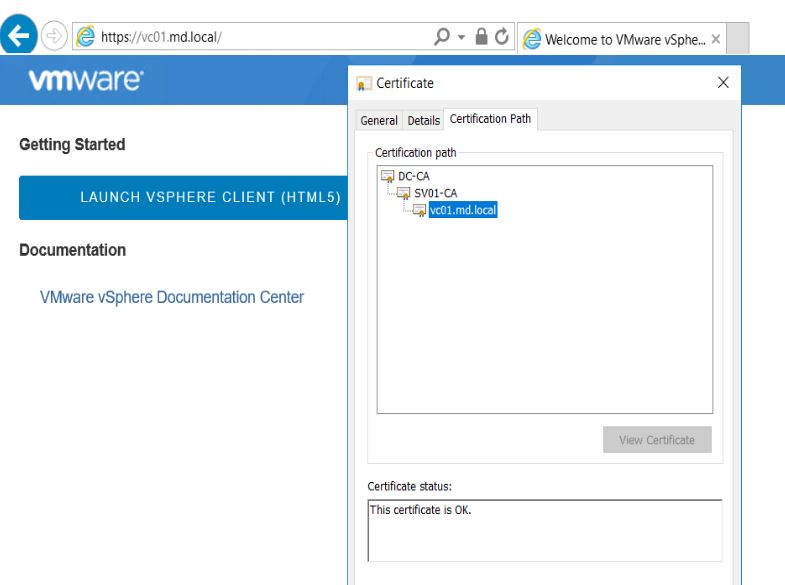
 Click on the Certificate and check the certification path. you will see a full chain of vCenter server certificates.
You can also validate the same after login to the vCenter server and Certificate Management page.
That’s it. We have gone through the detailed procedure to replace the vCenter Server self-signed certificate with a Custom CA-signed certificate. I hope this is informative for you. Thanks for Reading. be social and share it with social media, if you feel worth sharing it.