

Once Cluster preparation is completed, It time to configure the VXLAN. Virtual Extensible LAN (VXLAN) enables you to create a logical network for your virtual machines across different networks. You can create a layer 2 network on top of your layer 3 networks. VXLAN transport networks deploy a VMkernel interface for VXLAN on each host. This is the interface that will encapsulate network segments packets if it needs to reach a guest on another host. By encapsulating via a VMkernel interface the workload is totally unaware of this process occurring. As far as the workload is concerned the two guests are adjacent on the same segment when infact they could be spanning many L3 boundaries.
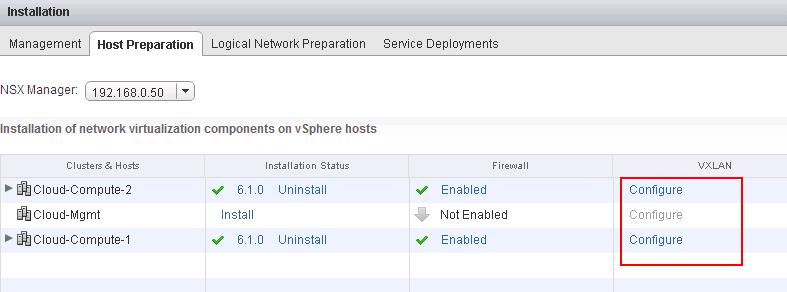
To configure the VXLAN, Login to the Web Client > Networking & Security > Installation > Host Preparation-> Configure . A wizard will ask for VXLAN networking configuration details. This will create a new VMkernel port on each host in the cluster as the VXLAN Tunnel Endpoint (VTEP).
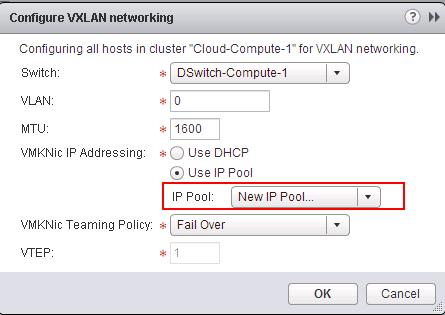
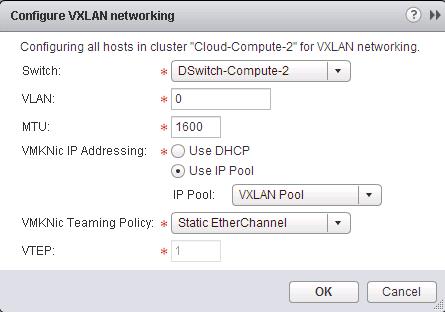
Provide the below options to configure the VTEP VMkernel Port:
- Switch – Select the DvSwitch from the drop-down for attaching the new VXLAN VMkernel interface.
- VLAN – Enter the VLAN ID to use for VXLAN VMkernel interface. Enter “0″ if you’re not using a VLAN, which will pass along untagged traffic.
- MTU – The recommended minimum value of MTU is 1600, which allows for the overhead incurred by VXLAN encapsulation. It must be greater than 1550 and the underlying network must support the increased value. Ensure your distributed vSwitch (DSwitch) set MTU size more than 1600.
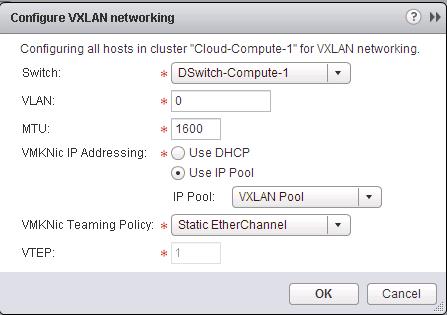
- VMKNic IP Addressing – You can specify either IP Pool or DHCP for IP addressing. I don’t have DHCP in my environment. Select “New IP Pool” to create a new one same as we created during NSX controller deployment. I have used a IP pool called “ VXLAN Pool”
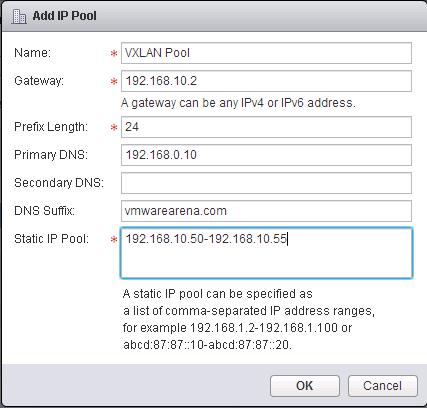
Enter the IP Pool Name, Gateway, Prefix Length, Primary DNS,DNS Suffix and Static IP Pool range for this New IP Pool and click on Ok to create the New IP Pool.
- VMKNic Teaming Policy – This option is define the temaing policy used for bonding the vmnics (physical NICs) for use with the VTEP port group. I have left with the default Teaming policy “Static EtherChannel”
- VTEP – I left the default one and it is not even allowed to configure ,if you choose “Static EtherChannel” as your Teaming policy.
Click on Ok to create the new VXLAN vmkernel interface in the ESXi hosts.
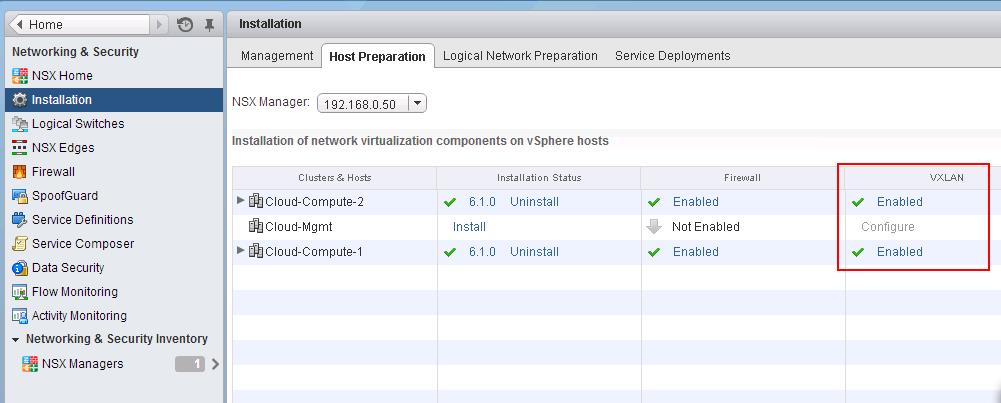
Once the VXLAN is configured, You will be able to see the status of the VXLAN is changed to “Enabled” for that particular cluster.

As discussed in previous steps, Configure the VXLAN for other clusters in your vCenter.

 Both of my compute clusters are configured with VXLAN and VXLAN status turned to “Enabled”.
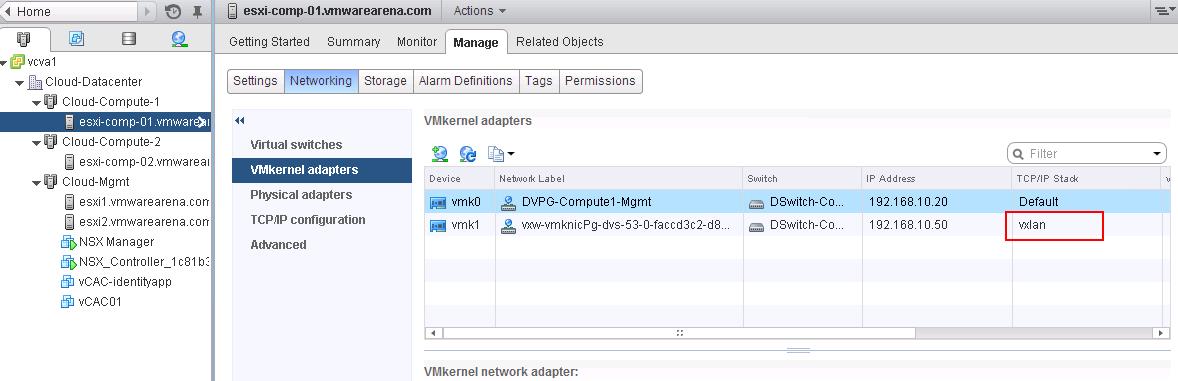
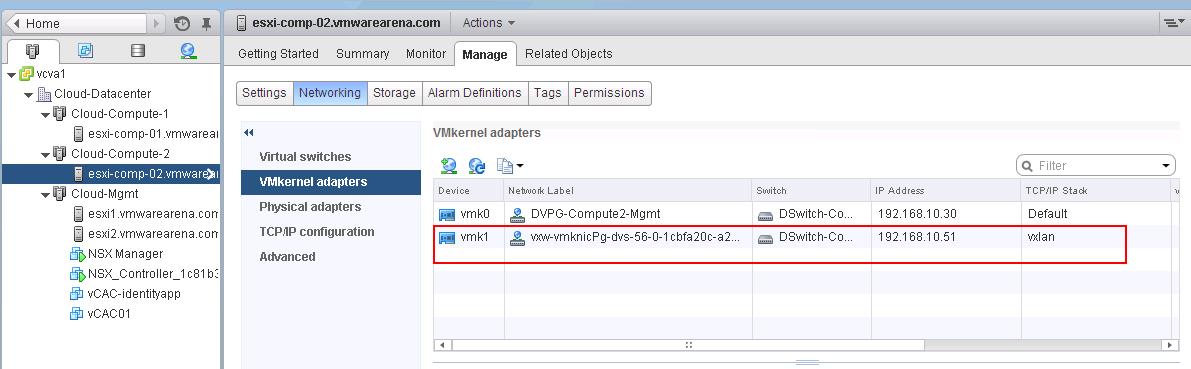
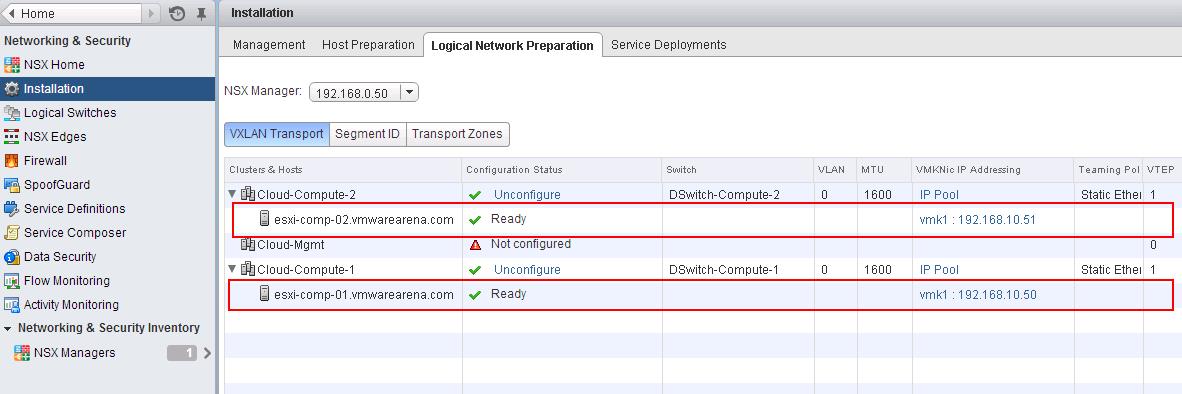
You can notice the VXLAN VMkernel interface is created for the ESXi hosts in the Compute clusters. It assigns the IP address for the VXLAN VMKernel interface from the IP Pool which we have created earlier.
You can verify the same from the Networking & Security > Installation > Logical Network Preparation>VXLAN Transport.
We are done with configuring VXLAN for ESXi hosts. We will configure Segment ID and transport Zones in the upcoming posts. I hope this is informative for you. Thanks for Reading!!!. Be Social and share it in social media, if you feel worth sharing it.
Other VMware NSX Related Posts:
VMware NSX Installation Part 1 – NSX Overview & Installation Prerequistes
VMware NSX Installation Part 2 – NSX Lab Design & Deploying NSX Manager
VMware NSX Installation Part 3 – Integrating NSX Manager with vCenter Server
VMware NSX Installation Part 4 – Deploying NSX Controller
VMware NSX Installation Part 5 – Checking NSX Controller Status
VMware NSX Installation Part 6 – Preparing Cluster and Hosts for NSX
VMware NSX Installation Part 7 – Verify NSX VIBs Installation from ESXi hosts
VMware NSX Installation Part 8 – Configuring VXLAN on the ESXi Hosts
VMware NSX Installation Part 9 -Create Segment ID and Transport Zones
VMware NSX Installation Part 10 – Create NSX Logical Switch
VMware NSX Installation Part 11 – Creating Distributed Logical Router
VMware NSX – Backup & Restore VMware NSX Manager Data
VMware NSX – Unable to Delete/Remove NSX Logical Switch
VMware NSX – How to Manually Install NSX VIBS on ESXi Host
VMware NSX – How to Manually Remove NSX VIBs from ESXi Host?
How to Remove NSX (Network & Security) Extension from vSphere Web Client