

VMware has already moved most of its software such as vCenter Server, etc into the appliance-based rather than depending on Windows OS. Instaling VMware Softwares on windows servers need an additional administrative overhead of managing the operating systems and operating system patches. In the movement of the software from windows to appliance-based, the last piece was the VMware Site Recovery Manager. Till the release of VMware SRM 8.2, SRM can only be installed on Windows operating systems. With the release of VMware SRM 8.2, VMware introduced the SRM virtual appliance. we still have windows based SRM but VMware strongly recommends to migrate it to appliance-based Site Recovery Manager. In this article, we will explain the detailed procedure on how to migrate Windows SRM to SRM Virtual Appliance.
VMware SRM virtual appliance is a photon OS-based virtual appliance. This new virtual appliance, which can be installed directly from vCenter using the deploy OVF template wizard. This is similar to the vCenter server appliance which makes the appliance administration simpler.
How to Migrate Windows SRM to SRM Virtual appliance
Before start migrating windows SRM to SRM virtual appliance, Let’s understand the pre-requisites for the migration.
- Verify that you have upgraded your Site Recovery Manager for Windows instance to version 8.2. (If you are running SRM 8.1 on Windows, you have to first upgrade the SRM from 8.1 to SRM 8.2 on the windows server)
- Stop the Site Recovery Manager Server Service on the Windows host machine.
- Deploy the Site Recovery Manager Virtual Appliance (You can deploy the SRM appliance with the same hostname and IP address as in Windows. Keep the appliance in Powered off state until we power off the windows before data export)
I categorize the migration steps into 6 steps to migrate windows SRM to SRM Virtual appliance
- Stop the SRM service in Windows SRM Server
- Export the SRM data from Windows SRM Server
- Deploy the Site Recovery Manager Appliance
- Move the exported SRM data from windows SRM to SRM appliance
- Import the SRM data to SRM Virtual Appliance
- Reconnect the SRM Pairing
Let’s talk about each of the steps in detail:
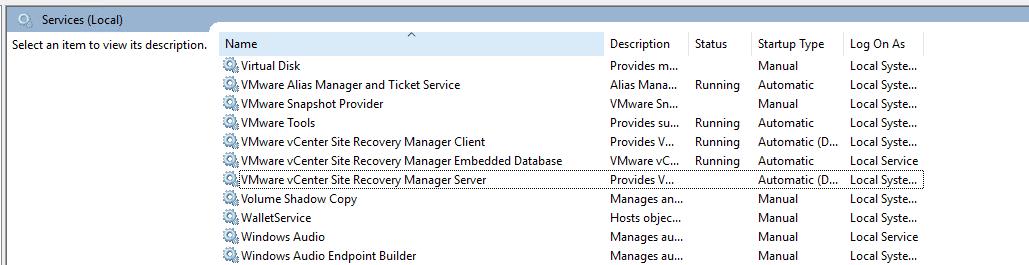
1. Stop the SRM Service in the Windows SRM Server
Once the Windows SRM server is upgraded to Site Recovery Manager 8.2, log in to the server Windows SRM server and Open the Services -> Stop the service ” VMware vCenter Site Recovery Manager Server”
2. Export the SRM data from Windows SRM Server
Once the SRM Server Service is stopped, open a command prompt, and navigate to the bin folder in the Site Recovery Manager installation directory. In my case, “C:\program files\VMware\VMware vCenter Site Recovery Manager\bin”
Create a Folder in the local server to save the exported SRM data. In my case “SRM-Data”.
Run the below command to export the SRM Data
.\export-srm-data.bat <folder-name>

Example:

.\export-srm-data.bat c:\SRM-Data
When prompted, enter a password. This password is needed when you are importing this SRM data into the SRM appliance.
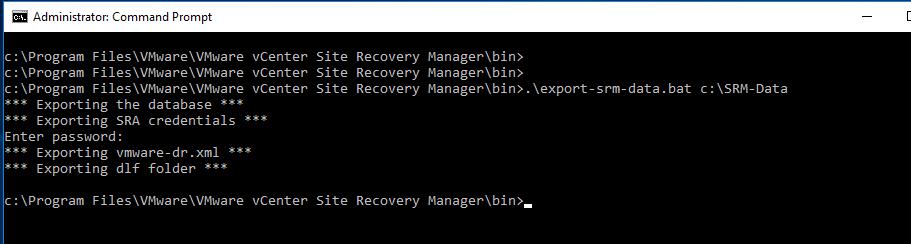
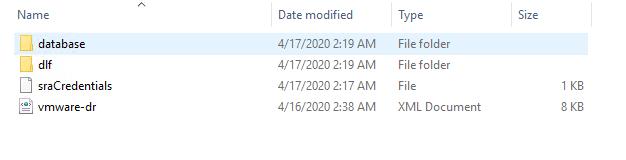
Validate the specified folder is containing the exported SRM data.
3. Deploy the Site Recovery Manager Appliance
NOTE: Before Deploying the new Site Recovery Manager Appliance, Rename the Windows based SRM VM to something like “vmname-Win-old”
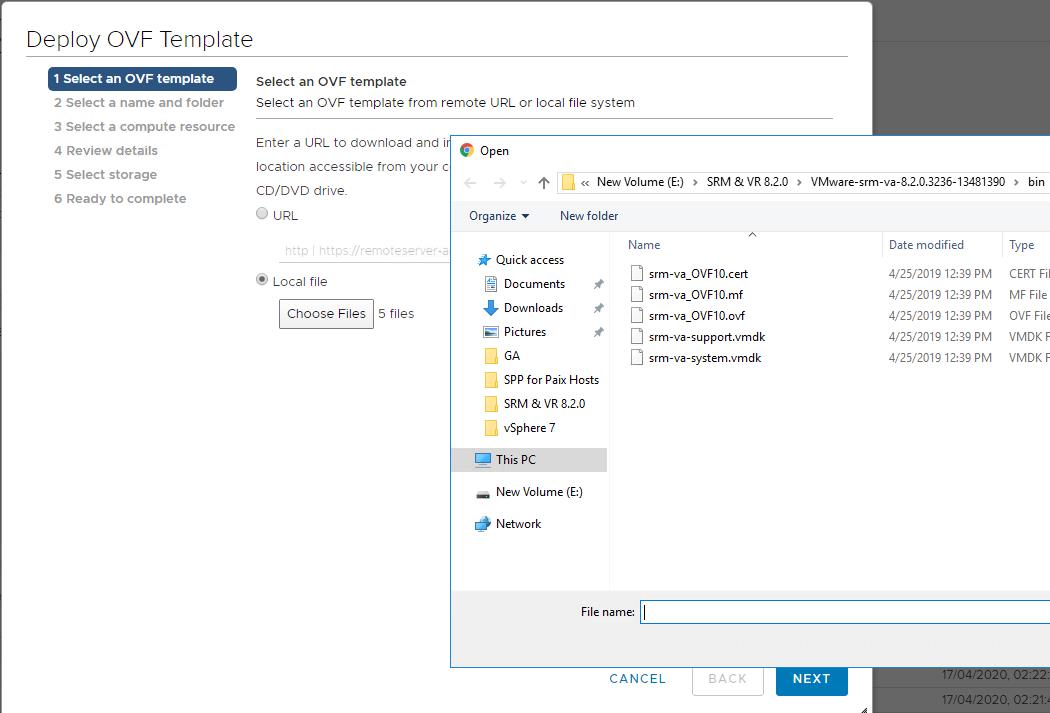
Deploying the Site Recovery Manager appliance is similar to deploying any VMware appliances. Deploy the SRM appliance with the same hostname and IP address as in the window SRM server but do not power on at this time.
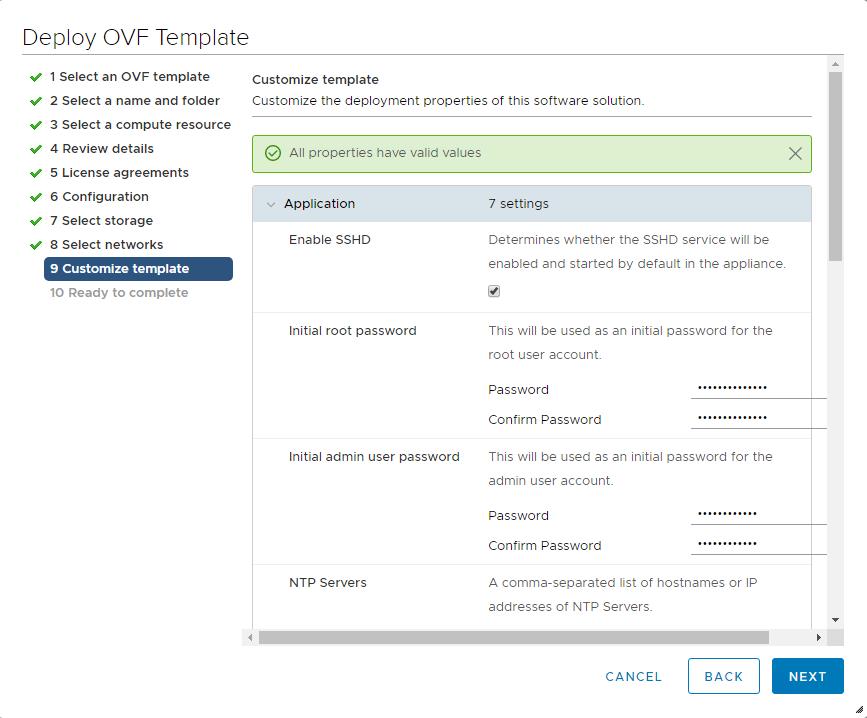
Log in to vCenter Server -> Deploy OVF Template. Select all the files which you have downloaded from the VMware website.
Review the template details of Site Recovery Manager appliance. Click Next.

In the customize template, Specify the deployment properties like IP settings, password for root and admin user account. Specify the same hostname and IP address as the windows SRM server. Click Finish to start the SRM appliance deployment.
4. Move the exported SRM data from windows SRM to SRM appliance
In Step 2, We have exported the SRM data from the SRM windows server.
- Move the exported SRM data from the window SRM server to other shared folder or file share. Once the data is moved into the shared folder or another file share, Shutdown the Windows SRM Server.
- Once the Windows SRM server is powered off, Power on the SRM appliance VM.
- Move the exported SRM data into the /home/admin directory of VMware SRM virtual appliance using Winscp.
5.Import the SRM data to SRM Virtual Appliance
Log in to the SRM virtual appliance with admin credentials. Then switch it to root using the command “su-“ and specify the root password.
CD into the directory /opt/vmware/srm/bin/
Run the below command to start importing the SRM data into SRM appliance
./import-srm-data.sh  </directory of moved SRM data>

Example

./import-srm-data.sh /home/admin/srm-data
- Enter the SSO administrator username and password.
- Enter the password for the”admin” account specified during the SRM appliance deployment.
- Enter the password to import the SRM data, which we have Set during the export process in Step 2
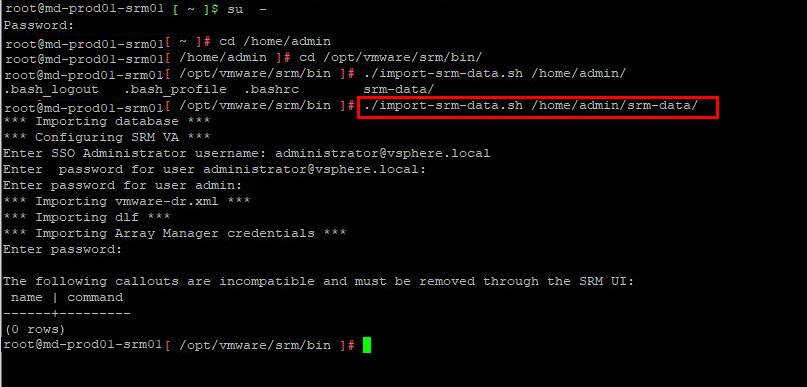
SRM data import to SRM virtual appliance is completed successfully. If any incompatibility, it will report during the import. In our case, we don’t have any issue with the import.
6. Reconnect the SRM Pairing
Once the SRM data import is completed, we need to reconfigure the SRM pairing between the Protected and Recovery site.
Select the first site from the list. Enter the address of the Platform Services Controller for the Site Recovery Manager Server on the second site, provide the user name and password, and click Next. Select the vCenter Server and the services (Site Recovery Manager) and click Next. On the Ready to complete page, review the pairing settings, and click Finish
That’s it. We have covered the entire procedure to Migrate Windows SRM to SRM Virtual Appliance. I hope this article is informative for you. Thanks for Reading!!!. Be social and share it with social media, if you feel worth sharing it.
Check out my articles on VMware SRM (Learn VMware SRM from Scratch)
- Part 1- Overview and Architecture
- Part 2 – VMware SRM 6.0 installation
- Part 3 – Configuring SRM Site Pairing
- Part 4 – Installing Storage Replication Adapters (SRAs)
- Part 5 – Configuring SRM Array Manager
- Part 6 – Creating SRM Resource Mappings
- Part 7 – Configuring SRM Folder Mapping
- Part 8 – Configuring SRM Network Mapping
- Part 9 – Configuring SRM Placeholder Datastores
- Part 10 – Creating SRM Protection Group
- Part 11 – Creating SRM Recovery Plans
- Part 12 – Running SRM Test Recovery
- Part 13 – Cleaning up Test Recovery
VMware SRM Array-Based Replication
- Part 1 – Deploying HP Store Virtual VSA
- Part 2 – Installing HP Store Virtual VSA Centralized Management Console (CMC)
- Part 3 – Configuring HP StoreVirtual VSA Management Group
- Part 4 – Adding ESXi host to HP VSA Management Group and Presenting Storage to ESXi
- Part 5 – Configuring HP StoreVirtual VSA Replication