

We always need a tool to manage, monitor and troubleshoot VMware vSAN. Ruby vSphere Console (RVC) is one of the primary tools to manage and troubleshoot vSAN environment. The Ruby vSphere Console is a console user interface for VMware ESXi and Virtual Center.The Ruby vSphere Console comes bundled with both the vCenter Server Appliance (VCSA) and the Windows version of vCenter Server. RVC is a programmable interface that allows administrators to query the status of vCenter Server, clusters, hosts, storage, and networking. For vSAN, there are quite a number of programmable extensions to display a considerable amount of information to manage and troubleshoot vSAN cluster using RVC. I will explain the some of the important commands to manage and troubleshoot vSAN cluster using RVC commands in this article. You can also manage and monitor VSAN using ESXCLI commands, Take a look at my article Monitor and Manage vSAN using esxcli vsan commands
How to Manage and Troubleshoot vSAN Cluster using RVC Commands
As we already discussed, There are quite a number of programmable extensions to display a considerable amount of information that you need to know about a vSAN cluster in the RVC (Ruby vSphere Console). We will see some of the important commands to manage and troubleshoot vSAN cluster using RVC commands.
How to Access RVC from vCenter Server appliance
To access Ruby vSphere Console (RVC), Log in to on your vCenter Server Appliance through SSH and run the below command and enter the user password if prompted.
rvc ssousername@hostname

Example:

rvc administrator@vSphere.local@localhost

Run the CD command to navigate to your vCenter Server directory.
cd localhost
Navigate to the data center for your vSAN environment and you can further navigate your cluster, host, VM and even VMDK of VM’s using CD command.
cd datacenter Name
example:
cd BLR-DC

You can use ~ to refer to your current datacenter, and all clusters are in the “computers” folder under your datacenter.
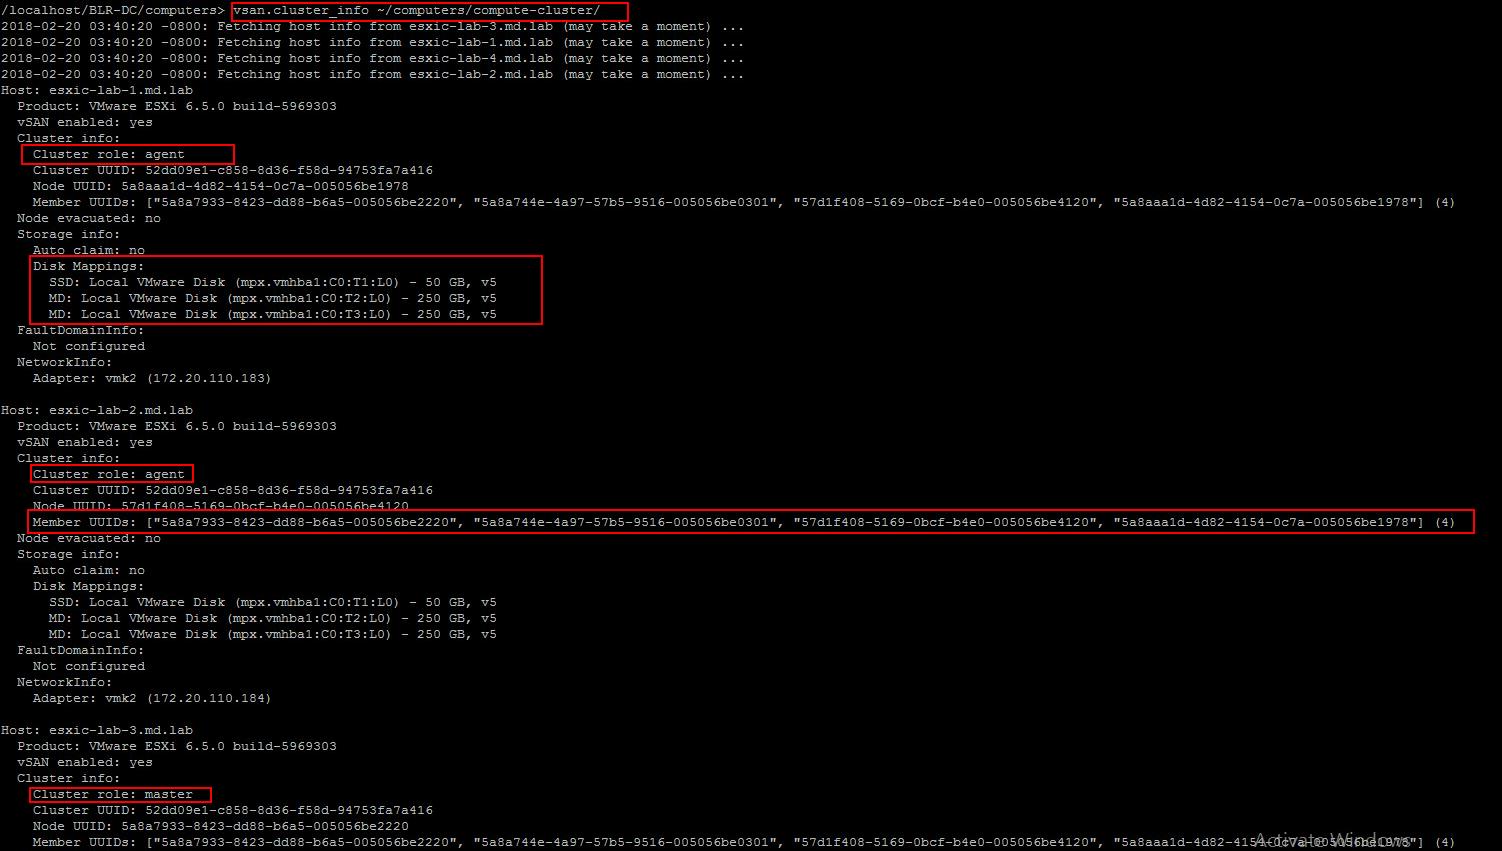
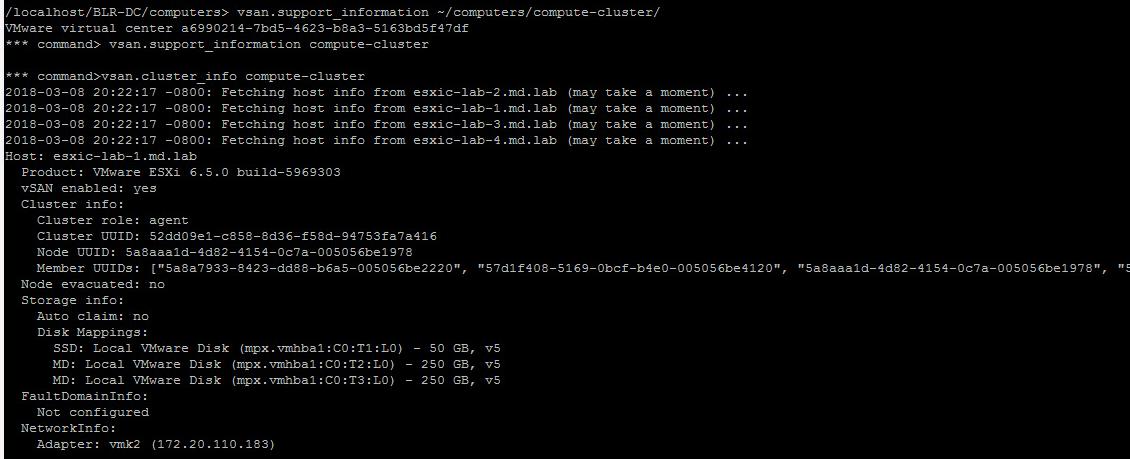
vsan.cluster_info ~cluster
This command prints cluster, storage and network information from all hosts in the vSAN cluster. It displays the complete information of all the hosts which are part of the vSAN cluster. It also shows the role of each ESXi host in the vSAN cluster
There are 3 types of roles Master, backup and agent. When a vSAN cluster is created, Each ESXi host in the vSAN cluster will be assigned to particular host roles in the vSAN cluster. These roles are for vSAN Clustering service only. The clustering service (CMMDS) is responsible for maintaining an updated directory of disks, disk groups and objects reside on each ESXi host in the vSAN cluster. This role is not responsible or related to handling objects and I/O.
This role allows nodes in the cluster to keep track of other nodes in the vSAN cluster. The clustering service is based on a master (with a backup) and agents. All the ESXi nodes in the cluster send updates to the master and then master redistributes them to agents. Electing master node is automatic and we don’t have control over on the election process.
In case of master node failure, backup node will hold all the information and this speed up the process of electing a new master node instead of all nodes resending their directory contents from their respective view of the cluster to the new master.
vsan.cluster_info ~/computers/vsanclustername/
vsan.apply_license_to_cluster
This command is used to apply a VSAN license to a VSAN cluster. The command runs against a cluster object and takes a license key as an argument.
vsan.apply_license_to_cluster {cluster} {-k, --license-key}

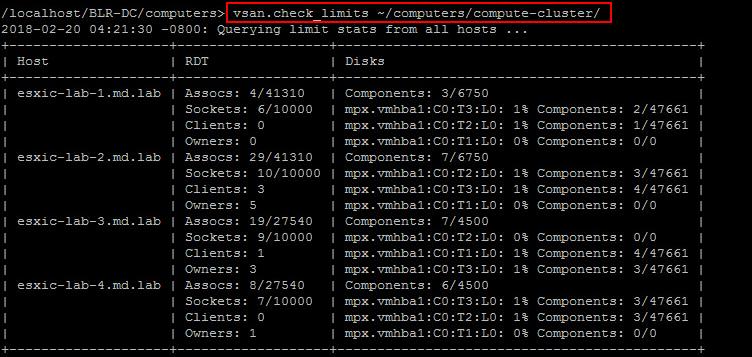
vsan.check_limits
This command displays resource information and is useful for ensuring that Virtual SAN is operating within its resource limits. The command runs against a cluster object. Check out my article to understand limitation and configuration maximum of vSAN 6.6
RDT relates to networking limits and Disks relates to storage limits. RDT is Reliable Datagram Transport and is the Virtual SAN network transport. RDT has a number of limits listed. These are Associations (Assocs) and Sockets. Additional information regarding Clients and Owners is also displayed.
vsan.check_state
This command performs 3 steps basically 3 tests on the vSAN cluster:
1.Check for inaccessible Virtual SAN objects
2.Check for invalid/inaccessible VMs
3.Check for VMs for which VC/hostd/vmx are out of sync
vsan.check_state ~/computers/clustername
Check for inaccessible Virtual SAN objects
This check performs the check for inaccessible vSAN objects. Inaccessible VSAN objects are an indication of the problem in the cluster. An invalid or inaccessible object is when the VM has objects that have lost the majority of its components or votes, again due to hardware failures.
Check for invalid/inaccessible VMs
This performs the check for any invalid or inaccessible VM’s in the vSAN datastore. This is likely due to the fact that the VM Home Namespace, where the .vmx file resides, is no longer online.
Check for VMs for which VC/hostd/vmx are out of sync
This step performs checks to ensure that the vCenter Server and the ESXi hosts are in agreement with regards to the state of the cluster

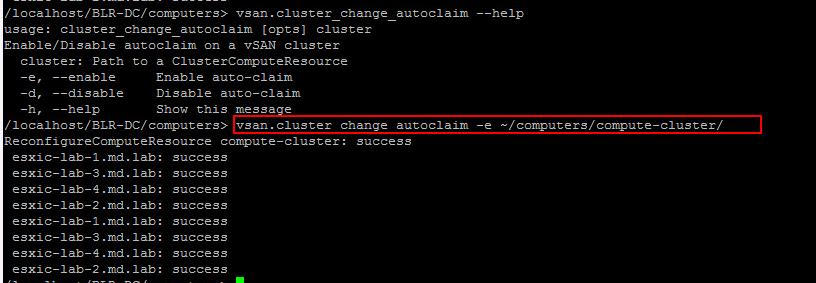
vsan.cluster_change_autoclaim
This command changes the disk auto claim mechanism. When enabled, Virtual SAN automatically claims any local, empty disks. If it is disabled, it does not claim disks automatically. It
takes a cluster object as an argument.
vsan.cluster_change_autoclaim -e ~/computers/clustername
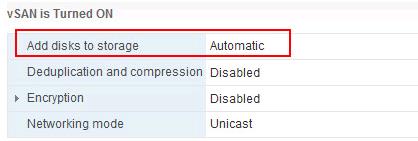
Once I have enabled the auto claim for the vSAN cluster, Add disks to storage changed to “Automatic”. You can validate it from Web client under vSAN cluster properties.
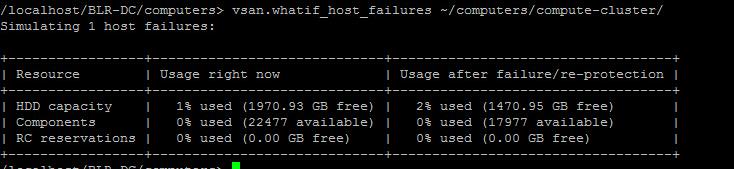
vsan.whatif_host_failures
This is a very useful RVC command for determining if there are enough resources remaining in the cluster to rebuild the missing components in the event of a failure.
The HDD capacity reported below refers to the capacity layer, both for all-flash and hybrid. RC reservations refer to read cache reservations, an option that allows an administrator to dedicate a certain amount of read-cache to a virtual machine through VM storage policy settings, but it is only relevant to hybrid configurations as there is no read cache reservation setting in all-flash configurations.
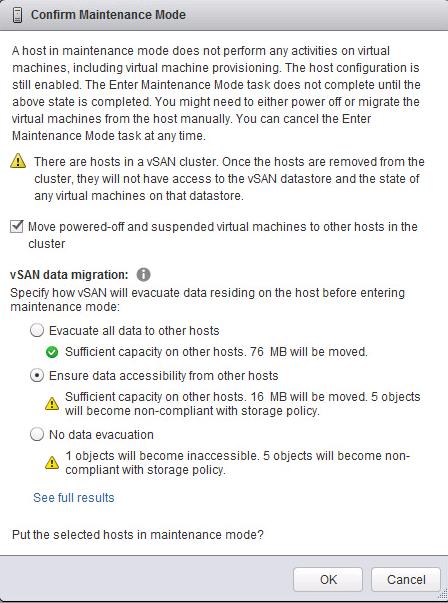
vsan.enter_maintenance mode
This command Place a host into maintenance mode. It also provides the ability through the ‘-e’ option to evacuate powered off VMs, and also offers the three data evacuation choices that are offered to administrators when they choose to enter maintenance mode via the vSphere web client. These choices are:
- ensureObjectAccessibility
- evacuateAllData
- noAction
To understand detailed information about each of the vSAN data migration option. Take a look at my article ESXi maintenance mode in vSAN Cluster
vsan.enter_maintenance_mode {cluster} {-t, --timeout} {-e, --evacuate-powered-off-vms} {-n,--no-wait} {-v, --vsan-mode} {-h, --help}

vsan.enter_maintenance_mode  -v evacuateAllData ~/computers/cluster/hostname/

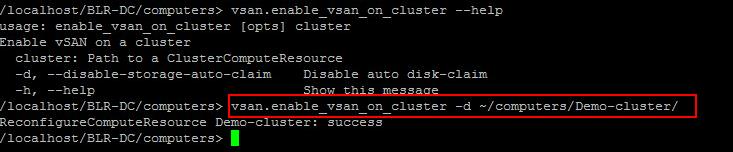
vsan.enable_vsan_on_cluster
This command allows you to enable VSAN on the ESXi cluster. It takes a cluster as an argument.
vsan.enable_vsan_on_cluster {cluster} {-d, --disable-storage-auto-claim} {-e, --enable-vsan-checksum-enforcement} {-h, --help}

vsan.enable_vsan_on_cluster -d ~/computers/Clustername
vsan.disable_vsan_on_cluster
This command Disable Virtual SAN on the vSAN enabled cluster. It takes the cluster as an argument. Note that this command does not prompt for confirmation, but simply goes ahead and disables Virtual SAN. Use with command with caution.
vsan.disable_vsan_on_cluster {cluster } {-h, --help}

vsan.disbale_vsan_on_cluster ~/computer/Democluster
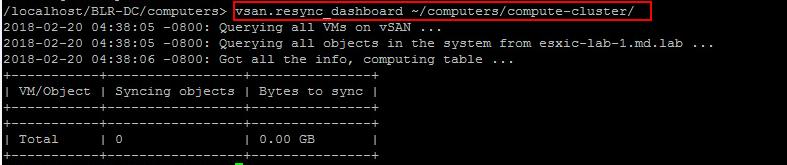
vsan.resync_dashboard
The command will display the re-syncing of the components that are being rebuilt elsewhere in the cluster. Using this command, it is possible to tell how many bytes are left to sync for that particular VM/Object. The command displays an overview of the resync/rebuild for a snapshot in time.
To get a sense of resync/rebuild progress, either run the command multiple times or use the –refresh-rate parameter to display an updated table at a fixed time interval.
vsan.resync_dashboard {cluster|host} {-r, --refresh-rate} {-h, --help}

vsan.resync_dashboard ~/computers/vsan clustername
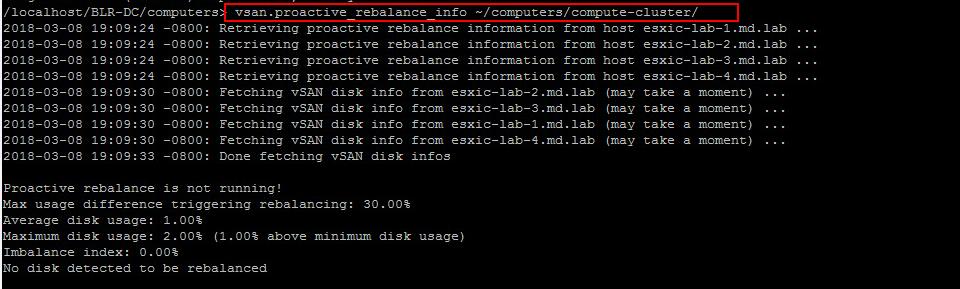
vsan.proactive_rebalance_info
This command displays information about proactive rebalancing activities, including whether or not proactive rebalance is running or not. The cluster is the argument for this command.
vsan.proactive_rebalance_info {cluster} {-h, --help}

vsan.procative_rebalance_info ~/computers/Clustername
vsan.proactive_rebalance
This command initiates the manual rebalance that looks at the distribution of components around the cluster, and will proactively begin to balance the distribution of components around the cluster. Otherwise rebalancing only begins to occur when a physical disk reached 80% capacity.
Proactive rebalance is not running by default. An administrator will have to initiate the proactive balancing of components with the –start option

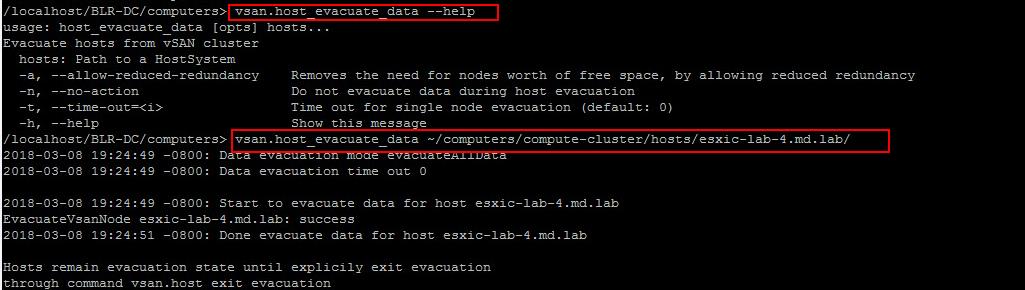
vsan.host_evacuate_data
This command is the data evacuation part of entering maintenance mode, but it does not do any of the compute/vSphere HA/etc. checks that one gets with maintenance mode. The command will evaluate the data on the host and ensure that VM objects are rebuilt elsewhere in the cluster to maintain full redundancy.
However, this can be overridden with the “–allow-reduced-redundancy” option, which evacuates the host but doesn’t initiate a rebuild due to lack of resources, i.e. a 3 =-node cluster. Another option is “–no-action”, which will run the command but not actually evacuate the host.
vsan.host_evacuate_data {host} {-a, --allow-reduced-redundancy} {-n, --no-action} {-t, --time-out} {-h, --help}

vsan.host_evacuate_data ~/computers/Clustername/hosts/hostname
vsan.host_exit_evacuation
This commands exits the host evacuation state and allows the disks on the host in question to be reused for virtual machine objects. For this command to be successful, the host should be evacuated earlier as similar to the previous step.
vsan.host_exit_evacuation {host} {-h, --help}

vsan.host_exit_evacuation ~/computers/clustername/hosts/hostname

vsan.upgrade_status
This command helps you to monitor the upgrade status of vSAN along with the details of the number of objects left to upgrade.You can also include the refresh interval to refresh the upgrade status during every interval. Below command will query the upgrade status every 60 seconds.
vsan.upgrade_status -r Cluster

vsan.upgrade_status -r 60 /localhost/VSAN-DC/computers/VSAN-Cluster/

vsan.support_information
This command generates a support bundles that includes the output of many RVC commands. This is extremely useful to the technical support personnel (GSS) at VMware. Typically the Virtual SAN cluster will be provided as an argument to the command, but a vCenter or a datacenter may also be provided.
You should only run this command when requested by VMware technical support. The goal is to generate a comprehensive output that can be sent to VMware Support so that a lot of information provided in RVC is readily available to engineers at VMware as part of a support request.
vsan.support_information ~/computers/clustername
In addition to the above list of commands, We have few more commands to manage and troubleshoot vSAN cluster using RVC commands. I will explain that in the upcoming posts. I hope this is informative for you. Thanks for Reading!!!